The White Board is Back Baby!…DIY Framed Weekly Menu Plan (free printable)

If you scour Pinterest or Houzz kitchens all you see these days are diy black chalkboards, (and they are everywhere)! But what if you’re not ready to commit to painting your cabinets with black chalkboard paint? What if you’re a renter? What if you just have really ugly handwriting? Originally I wanted a sexy black, chalkboard cabinet too, but then had to ask the question, “what would I really use it for?” The next step was logical, a weekly menu planning board! Yet before jumping into the land of chalkboard with both feet, and go crazy with paint. I decided to just dip the feet in and see if I’d actually keep up a weekly menu plan in the kitchen. Forget the chalk, we’re bringing back the white board marker!

free weekly menu planner

I have to give credit to the hubby for this project and a recent discussion we had. Over the past several months he’s felt a little left out of the weekly menu planning process. In all my nerdy excitement over couponing and meal planning this past year. The weekly menu consisted of scratched notes in my Busy People Budget binder.  I had overlooked his desire to be part of the planning process. We figured this board, would allow the two of us to work together, make changes, and both contribute to the weekly menu.

Also the intended surface in our kitchen has an old telephone jack, hiding it versus removal seemed the better option for two insanely busy people.

free weekly menu planner 5

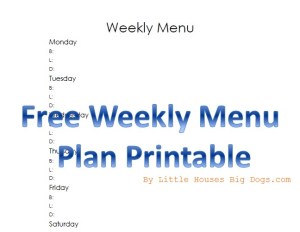
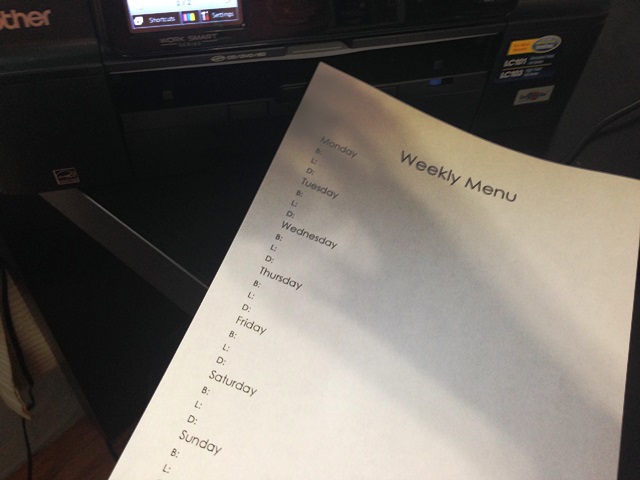
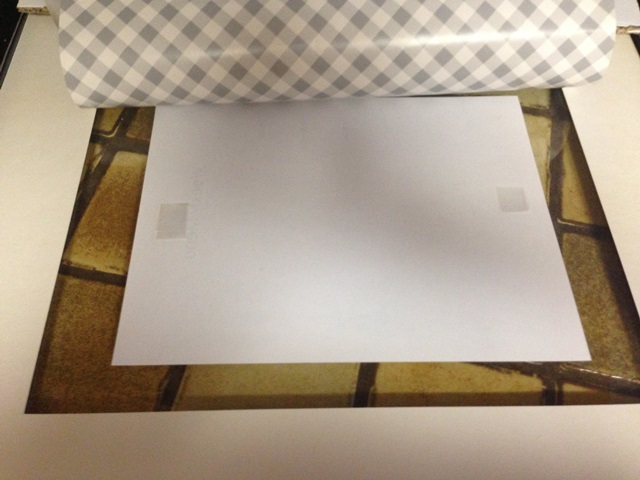
This project was so incredibly simple, no mad crafting skills necessary. Just find a big picture frame with a glass insert that you have around the house, some patterned paper or even use wrapping paper like we did. Print out our Free Weekly Menu Planner.

Free Weekly Menu Plan printable

Weekly Menu

Then tape the planner to your patterned paper with double stick tape and place in said frame.

free weekly menu planner 1free weekly menu planner 2

Hang and you’re ready to start  weekly menu planning. Super simple, inexpensive, and a great first step to turning a money saving/organization goal into a habit. You’ll just need a fine tipped white board pen, to get started.

free weekly menu planner 4

This is a great alternative to paint and diying a chalkboard.(Plus no ugly chalk smears.) A little windex and/or a paper towel and you’re ready for the next week! Happy Sunday everyone!free weekly menu planner

It’s the most awful time of the year…(Putting Christmas Away)

Free Storage Solutions for Christmas DecorationsOh yes, the Christmas decorations are down, and everyone is in “Resolutions” mode…No play, all work, and everyone saying words like “goals”, “organization”, etc. For a nerdy, goal oriented, semi-organized, person 11 months out of the year, saying good bye to Christmas (that one month where I let my hair down) is one of the saddest times of the year. (If given the chance my Christmas decorations would be up till Super Bowl, but then of course the neighbors would hate us). In the meantime I thought we would share some of our money saving/organization tips for storing away the clutter with free stuff you may already have at home. Because seriously, who wants to spend $40 on ornament storage…(as seen below from Amazon) Yuck! (Doesn’t this defeat the purpose of that resolution to save money?!)

.ornament storage

Especially when you can spend $6 for organic apples at Costco AND doubles as ornament storage…inexpensive ornament storage

(This idea is brought to you by my dad, he’s a pretty clever guy, no Pinterest necessary) Also if you’re a knitter/crocheter then this same idea is great for storing your yarn/twine…

inexpensive yarn caddy

Another awesome and free idea to store away those pesky Christmas lights is by using an empty tissue box…inexpensive christmas light storage

If you don’t care what it looks like then skip the next couple steps (but in case you need to get rid of some left over Christmas wrapping paper…) Wrap the box in wrapping paper, and make sure to cut away the paper at the tissue box opening, then  tape on the inside of the box.

inexpensive christmas light storage 1inexpensive christmas light storage 2

Then loop your Christmas lights, place in box and Voila! Instant Christmas light caddy…inexpensive christmas light storage 4

Again if you already put away the Christmas lights, then this idea can double as a plastic grocery bag caddy…(And with two supersized dobermans, plastic bags are a hot commodity for dog walking, if you know what I mean…)

inexpensive christmas light storage 3

Third idea is for all those pretty ribbons and garland you wanted to save…You just need a clean, leftover plastic container (i.e. cottage cheese, etc).

inexpensive christmas christmas ribbon caddy

Cut a cross in the lid, then place an end of your looped ribbon through the hole.

inexpensive christmas christmas ribbon caddy 1

Place the lid back on and you have an instant ribbon storage and caddy for next year’s decorating.

inexpensive christmas christmas ribbon caddy 2inexpensive christmas christmas ribbon caddy 3

Remember this same idea can be used as a yarn, or any type of ribbon/string caddy. Finally, our last storage tip is for storing those mini ornaments…Again with two large dogs who L-O-V-E tennis balls, we tend to accumulate many empty tennis ball canisters…inexpensive christmas christmas ornament caddy  We put these to good use by storing all the mini ornaments… And if not ornaments, these canisters make great paint brush caddys!

inexpensive christmas christmas ornament caddy 1

inexpensive paint brush caddy

All in all we hope these little storage ideas will help you check off two resolutions…organize and save some cash! Goodbye Christmas, (you do fit nicely away in one storage container) and Happy Sunday everyone!

storing away Christmas decorations


P.S. Check more amazing storage and organizational ideas at Remodelaholic’s Link Party! Oh and if you’re wondering where this post is at the Link up party…Its #58 under “Tandra” instead of the actual name “Free Storage Solutions for Christmas Decor”…Sad right?! (No this wasn’t me needing attention) Instead the computer copy/pasted the wrong info and then said computer/wifi froze up during my link up…Hopefully the 49ers have better luck than me today =) Again Happy Sunday everyone!

remodelaholic-party

Last Homemade Holiday Present Arrived!…Montana Thread Art

Need a thoughtful, homemade gift or art piece? We miss my little sister, brother-in-law and new nephew terribly, who now live in Texas. But to be honest,  they probably are homesick for their home state of Montana. They met in Missoula Montana for college and law school and we wanted to craft a little art piece that will make them smile. We would’ve liked to send them a Montana version of our California Marquee, but it would be way too hard to ship. Instead here is an easy, diy, Montana State Thread Art piece…diy easy montana wood nail thread art

Notice the heart is where Missoula is located? It looks difficult and time consuming but it surprisingly wasn’t. Instead it only took a little patience and a few evenings of college football games (It was a two-fer…I threaded Montana and at the same time earned some major “wife points” watching those games with the hubby) I consider this craft my version of embroidery or knitting (since I can’t do either one)…And it looks industrial, made of wood, nails, and made from stuff around the house, which our readers know this is more my style! Here is the how to for another state inspired art piece…

Materials/Tools

Hammer (Possibly needle nose pliers as well)

A printed stencil of the state you want to create on paper (we found ours on the internet for free and just printed it out)

A piece of thin wood (we had some scrap pieces that were perfectly sized to a shadow box frame)

A shadow box frame (The one we found was from Michaels, and even better with a 50% off holiday coupon)

Picture matting/border (This may not be necessary, but since I was using scrap wood in an odd size we needed it.  I used some blue matting from another picture we had at the house.)

Small picture framing nails

Thread (We used navy blue thread for military uniforms, we had some lying around the house but that’s another story)

First place your state stencil on the piece of wood and hammer the nails along the lines.

diy montana wood nail thread art 001diy montana wood nail thread art 002

To get the nails closely spaced I used a pair of needle nose pliers to stabilize the nails. (And prevent hammering your fingers) Don’t forget to add a little nail heart inside the state in order to string the thread to a central location (Although you don’t have to use a heart) Then once all the nails are in place, gently tear the paper stencil away from the wood. The result looks a little uneven and unfinished at first but once you start to add the thread it comes together.

diy montana wood nail thread art 003diy montana wood nail thread art 004

Threading is very simple, just make a little loop in the thread, and start in the middle working outward. Pull it taught, loop it twice around one outside nail, then back to the middle again. In order to not go crazy I would sometimes give myself a break and tie the thread off in the middle before moving onto the next nail in the heart. Here is a video link and detailed How to for string art: http://www.wikihow.com/Do-String-Art

Finally when done, (And glad you did not throw the project out the window) place it in the shadow box with matting. Now its ready for your wall at home or mail it off to three awesome people in your life (who may be far in distance but never far from your heart). That’s the holiday present round up everyone! Happy Sunday!

diy easy montana wood nail thread art

Homemade Holiday Present…For the “Beer Lover” in your Life

Do you have a beer loving, brother, cousin, or friend? And does this person have a bachelor pad or even a significant other who doesn’t mind beer bottle cap decor in their house? (I think my little sister and bro in law might fall under this category…sorry guys, but I promise you’ll LOVE the other gift I made you)

Then you’re in luck! Here is another inexpensive, homemade holiday gift sure to wow that beer lover in your life…

diy gift beer bottle cap refrigerator magnets

Unfortunately this present never made it to the lil bro in time for Christmas (due to glue drying issues…more on that) however he was pretty stoked about the last minute replacement gift of a porcelain red solo cup. (Classy right?) My younger brother lives in a total bachelor pad, is a beer lover and our family mountain man. I’m sure you have one of these kinds of guys in your life and here is an easy and inexpensive gift to make for them:

Materials/Tools:

Beer bottle caps (these were “painstakingly” provided by my husband and friends, thanks for taking one for the team boys!)

Glue (We found gorilla glue worked the best in the end, don’t base it on our pictures and go with Tacky glue)

Peel and stick magnets

Cork mat remnants (I found mine at Target two years ago, for another craft and used the leftovers, but I’m pretty sure Target still sells them)

Scissors

First round up your bottle caps, then trace them onto the cork mat. diy gift beer bottle cap magnets 002

Next cut out the cork circles with scissors, add glue generously to the inside of the bottle cap and press the cork circle onto the glue. (Don’t worry about the cork not fitting just right, the cork crumbles and rips away easily enough so we were able to fit it to the cap)

diy gift beer bottle cap magnets 001

The following step, while the glue dried, we traced the bottle cap circles onto to peel and stick magnets, then cut them with scissors. diy gift beer bottle cap magnets 003

Finally we unpeeled the magnets paper backing, added additional glue to the cork, and placed the magnet on cork. (Sorry again, a note on the glue, don’t use Tacky glue, go with something stronger.)

diy gift beer bottle cap magnets 004

Another inexpensive, easy, holiday gift idea for the beer lover in your life, and to follow after our DIY seashell gifts from this year… One more for next week…Happy Sunday everyone!

diy gift beer bottle cap refrigerator magnets