On the Fence…

butterfly fence art

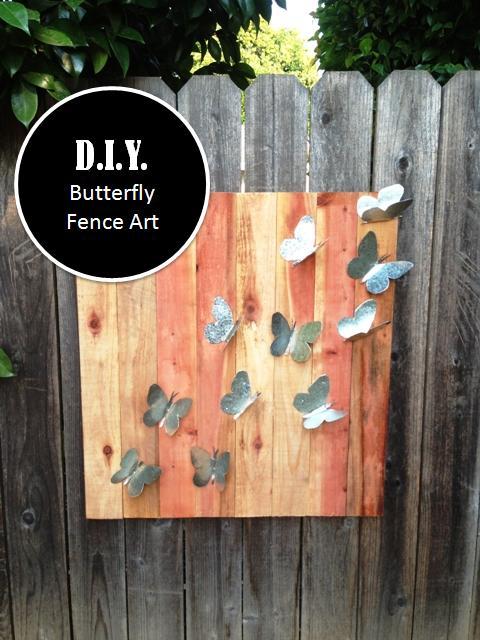
Do you have a bare, and lonely fence? Why not give it some butterfly friends? Apparently butterflies are all the home decor rage and I’m the DIY blogger late to the butterfly party…Our project inspiration came from these beauties at Katrina’s awesome blog Design Fabulous.

I may not be an interior designer by nature, but I absolutely love landscaping and yard art.

We needed a focal point in our backyard (other than telephone poles and wires), between our privacy screens. Also this butterfly yard art has to be tough, able to stand up to the elements and Sacramento heat…Hence redwood fencing and roof flashing butterfly fence art!

Here it is again, peeking out to the side of our redwood privacy screen.

butterfly fence art 016The materials were free from our previous Fence staining and Roof flashing backsplash projects. This little guy is very economical, simple and easy to create.

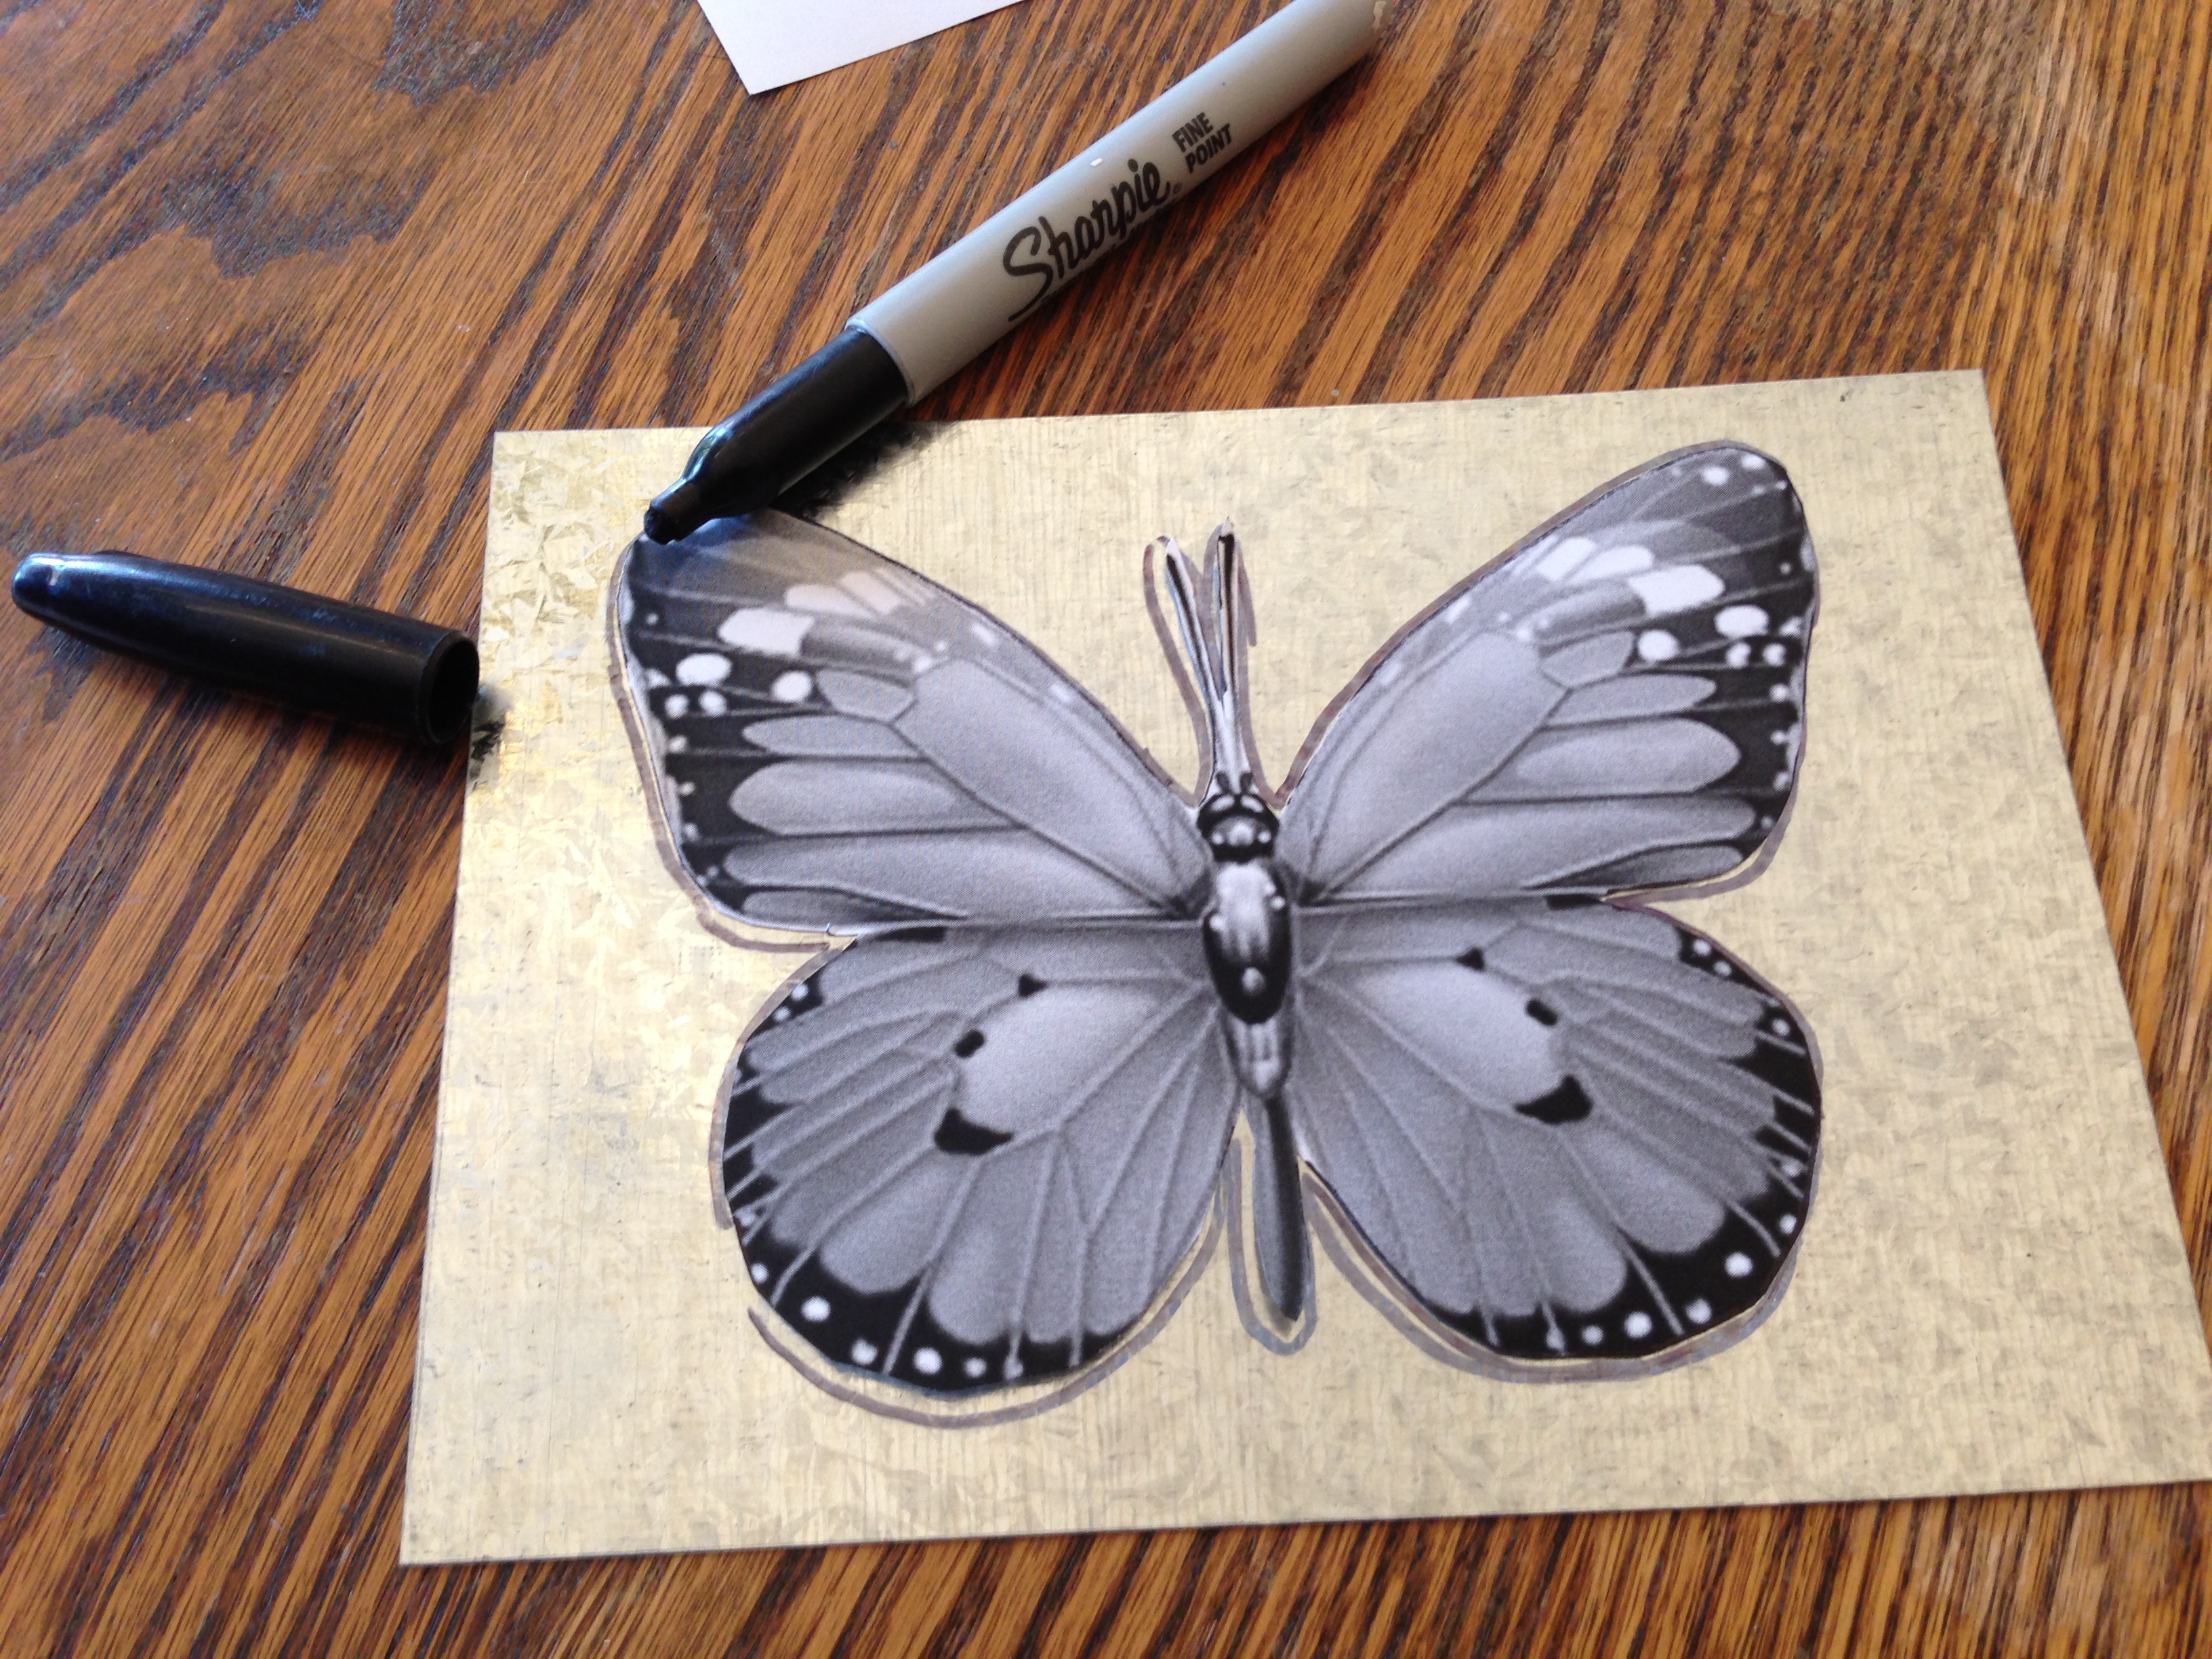
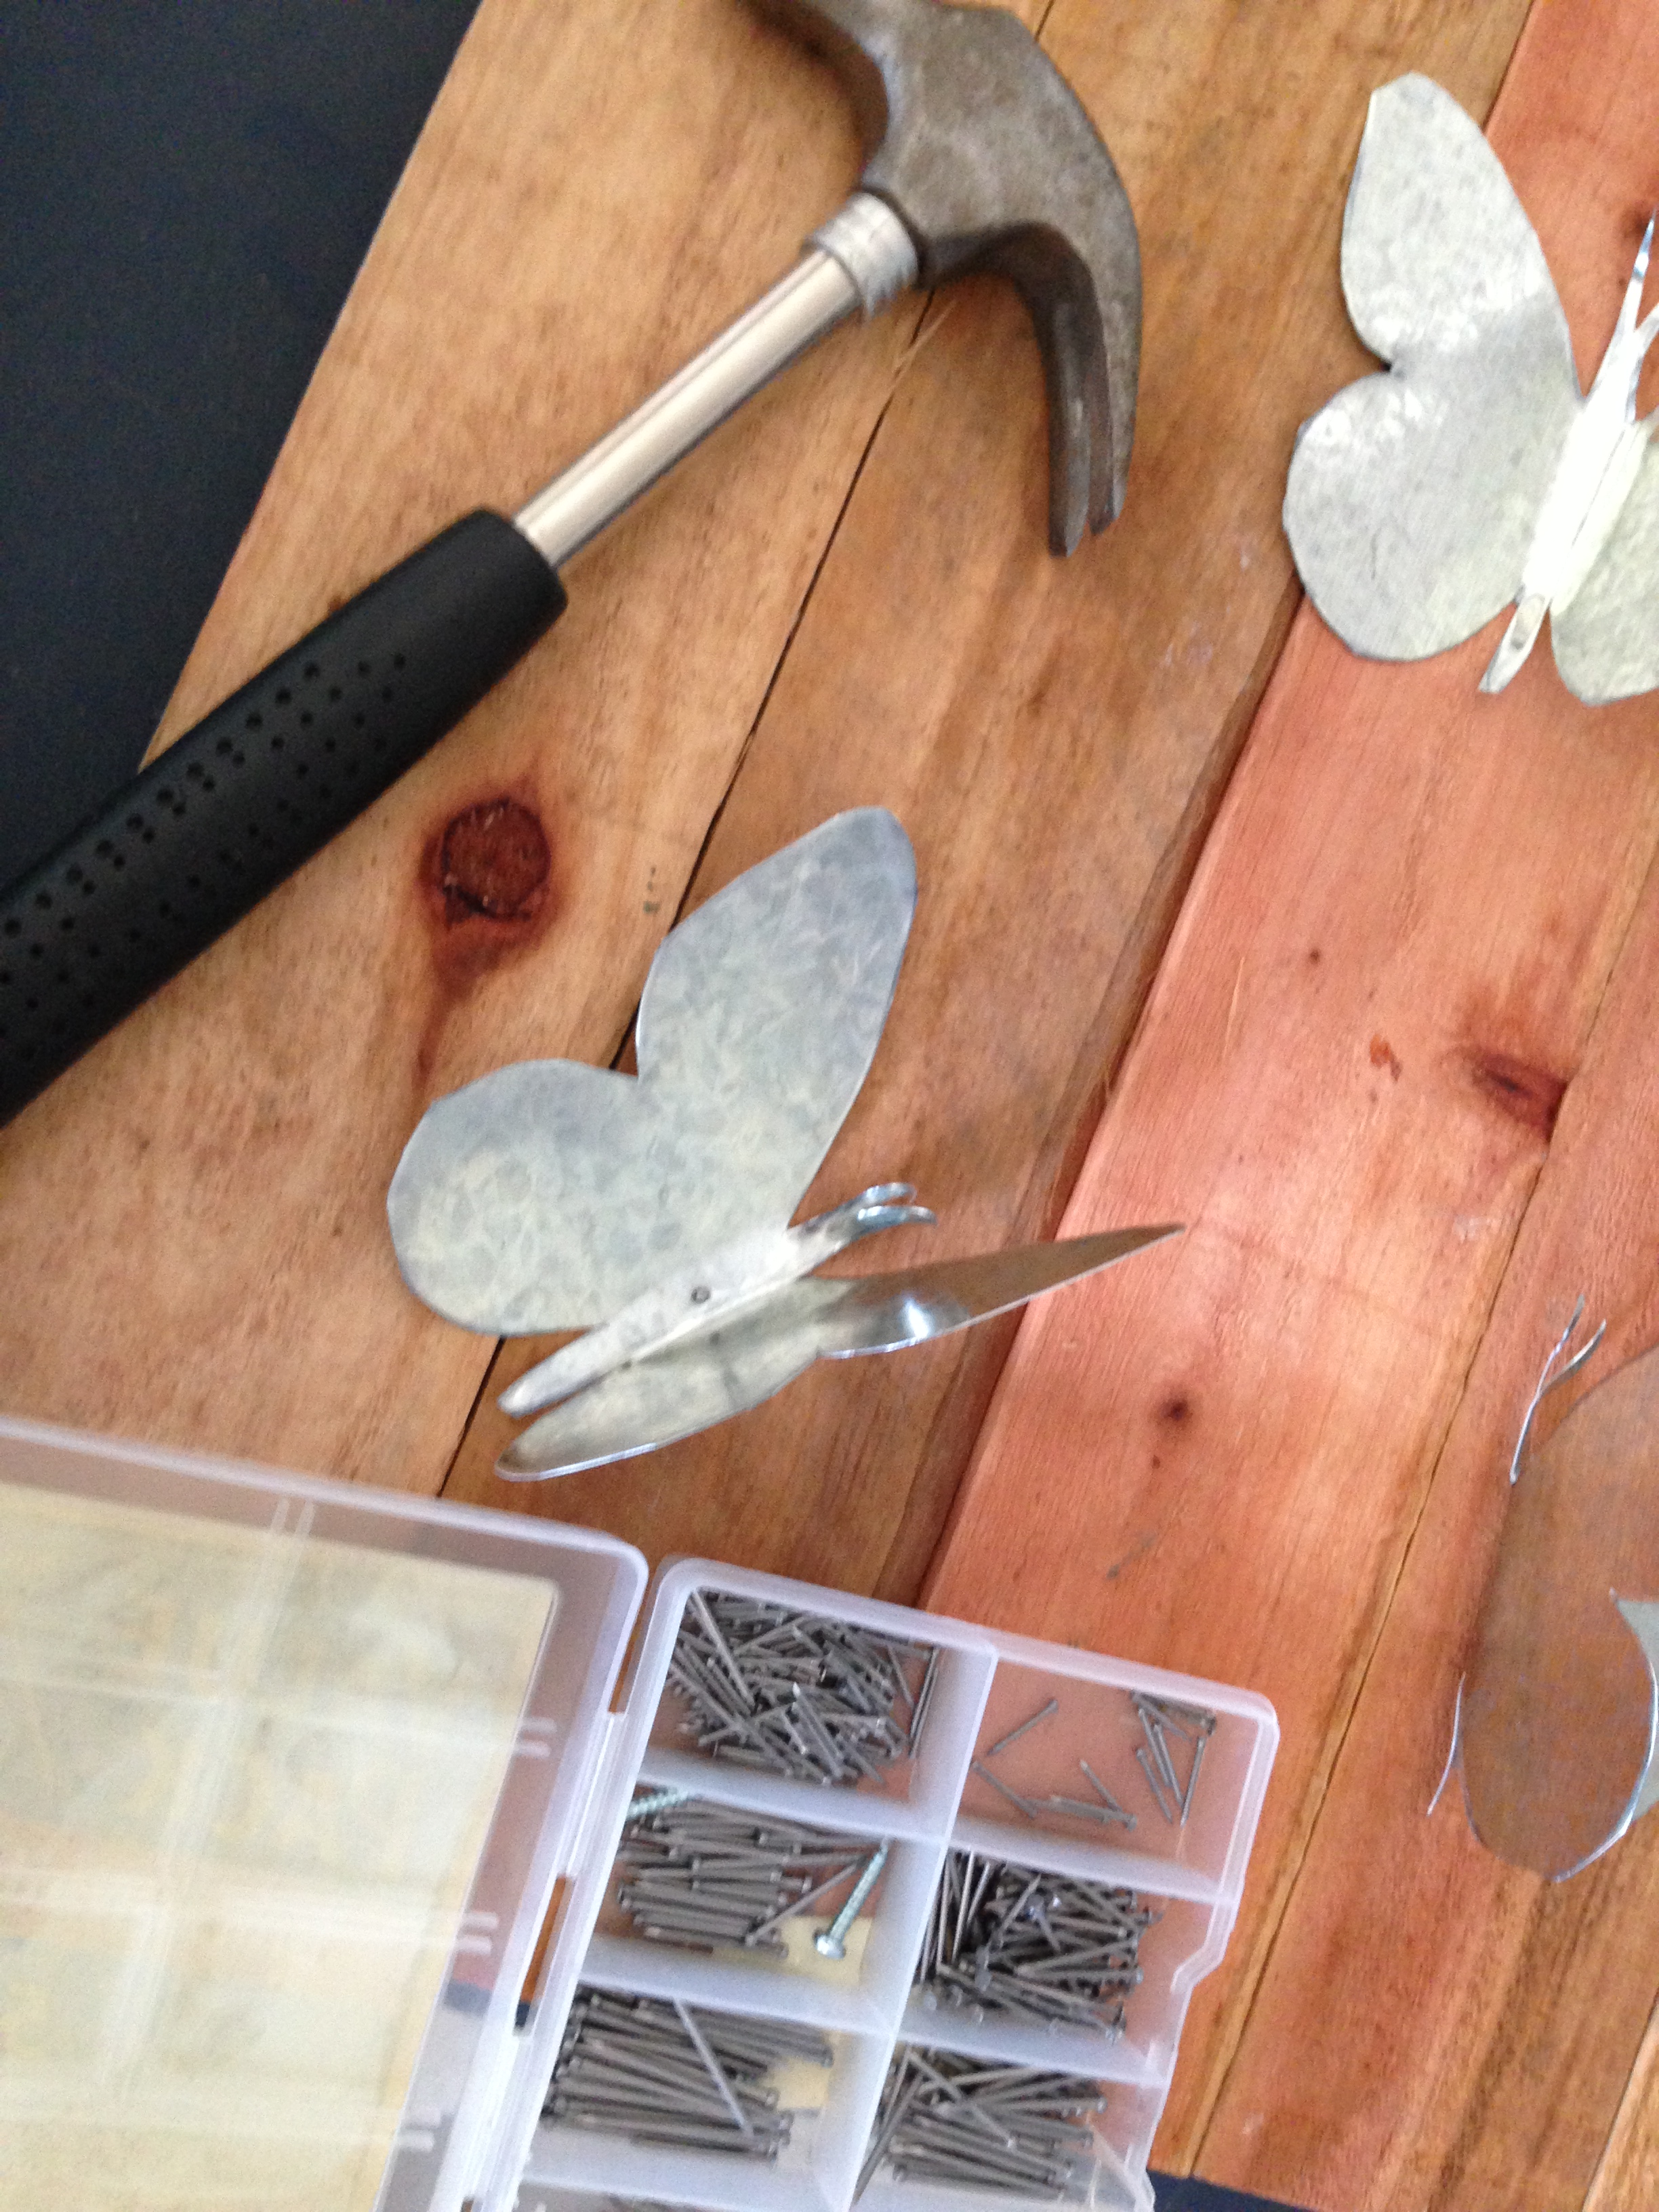
First, find some butterfly clip art in Word, cut out the shapes to create a stencil, and trace them onto the roof flashing with a sharpie.

butterfly fence art 001butterfly fence art 002

Next with heavy duty tin snips, cut out the butteflies. Gardening gloves may be recommended and do be careful when cutting the roof flashing, it can be sharp. (This project is definitely for adults and specifically those who aren’t prone to accidents.)

butterfly fence art 003butterfly fence art 004

Also don’t kill your hands and spirits by trying to tackle it all in one day. Cutting out butterflies with tin snips can take some time and your hands will be sore, best strategy is to cut a few at a time each evening.

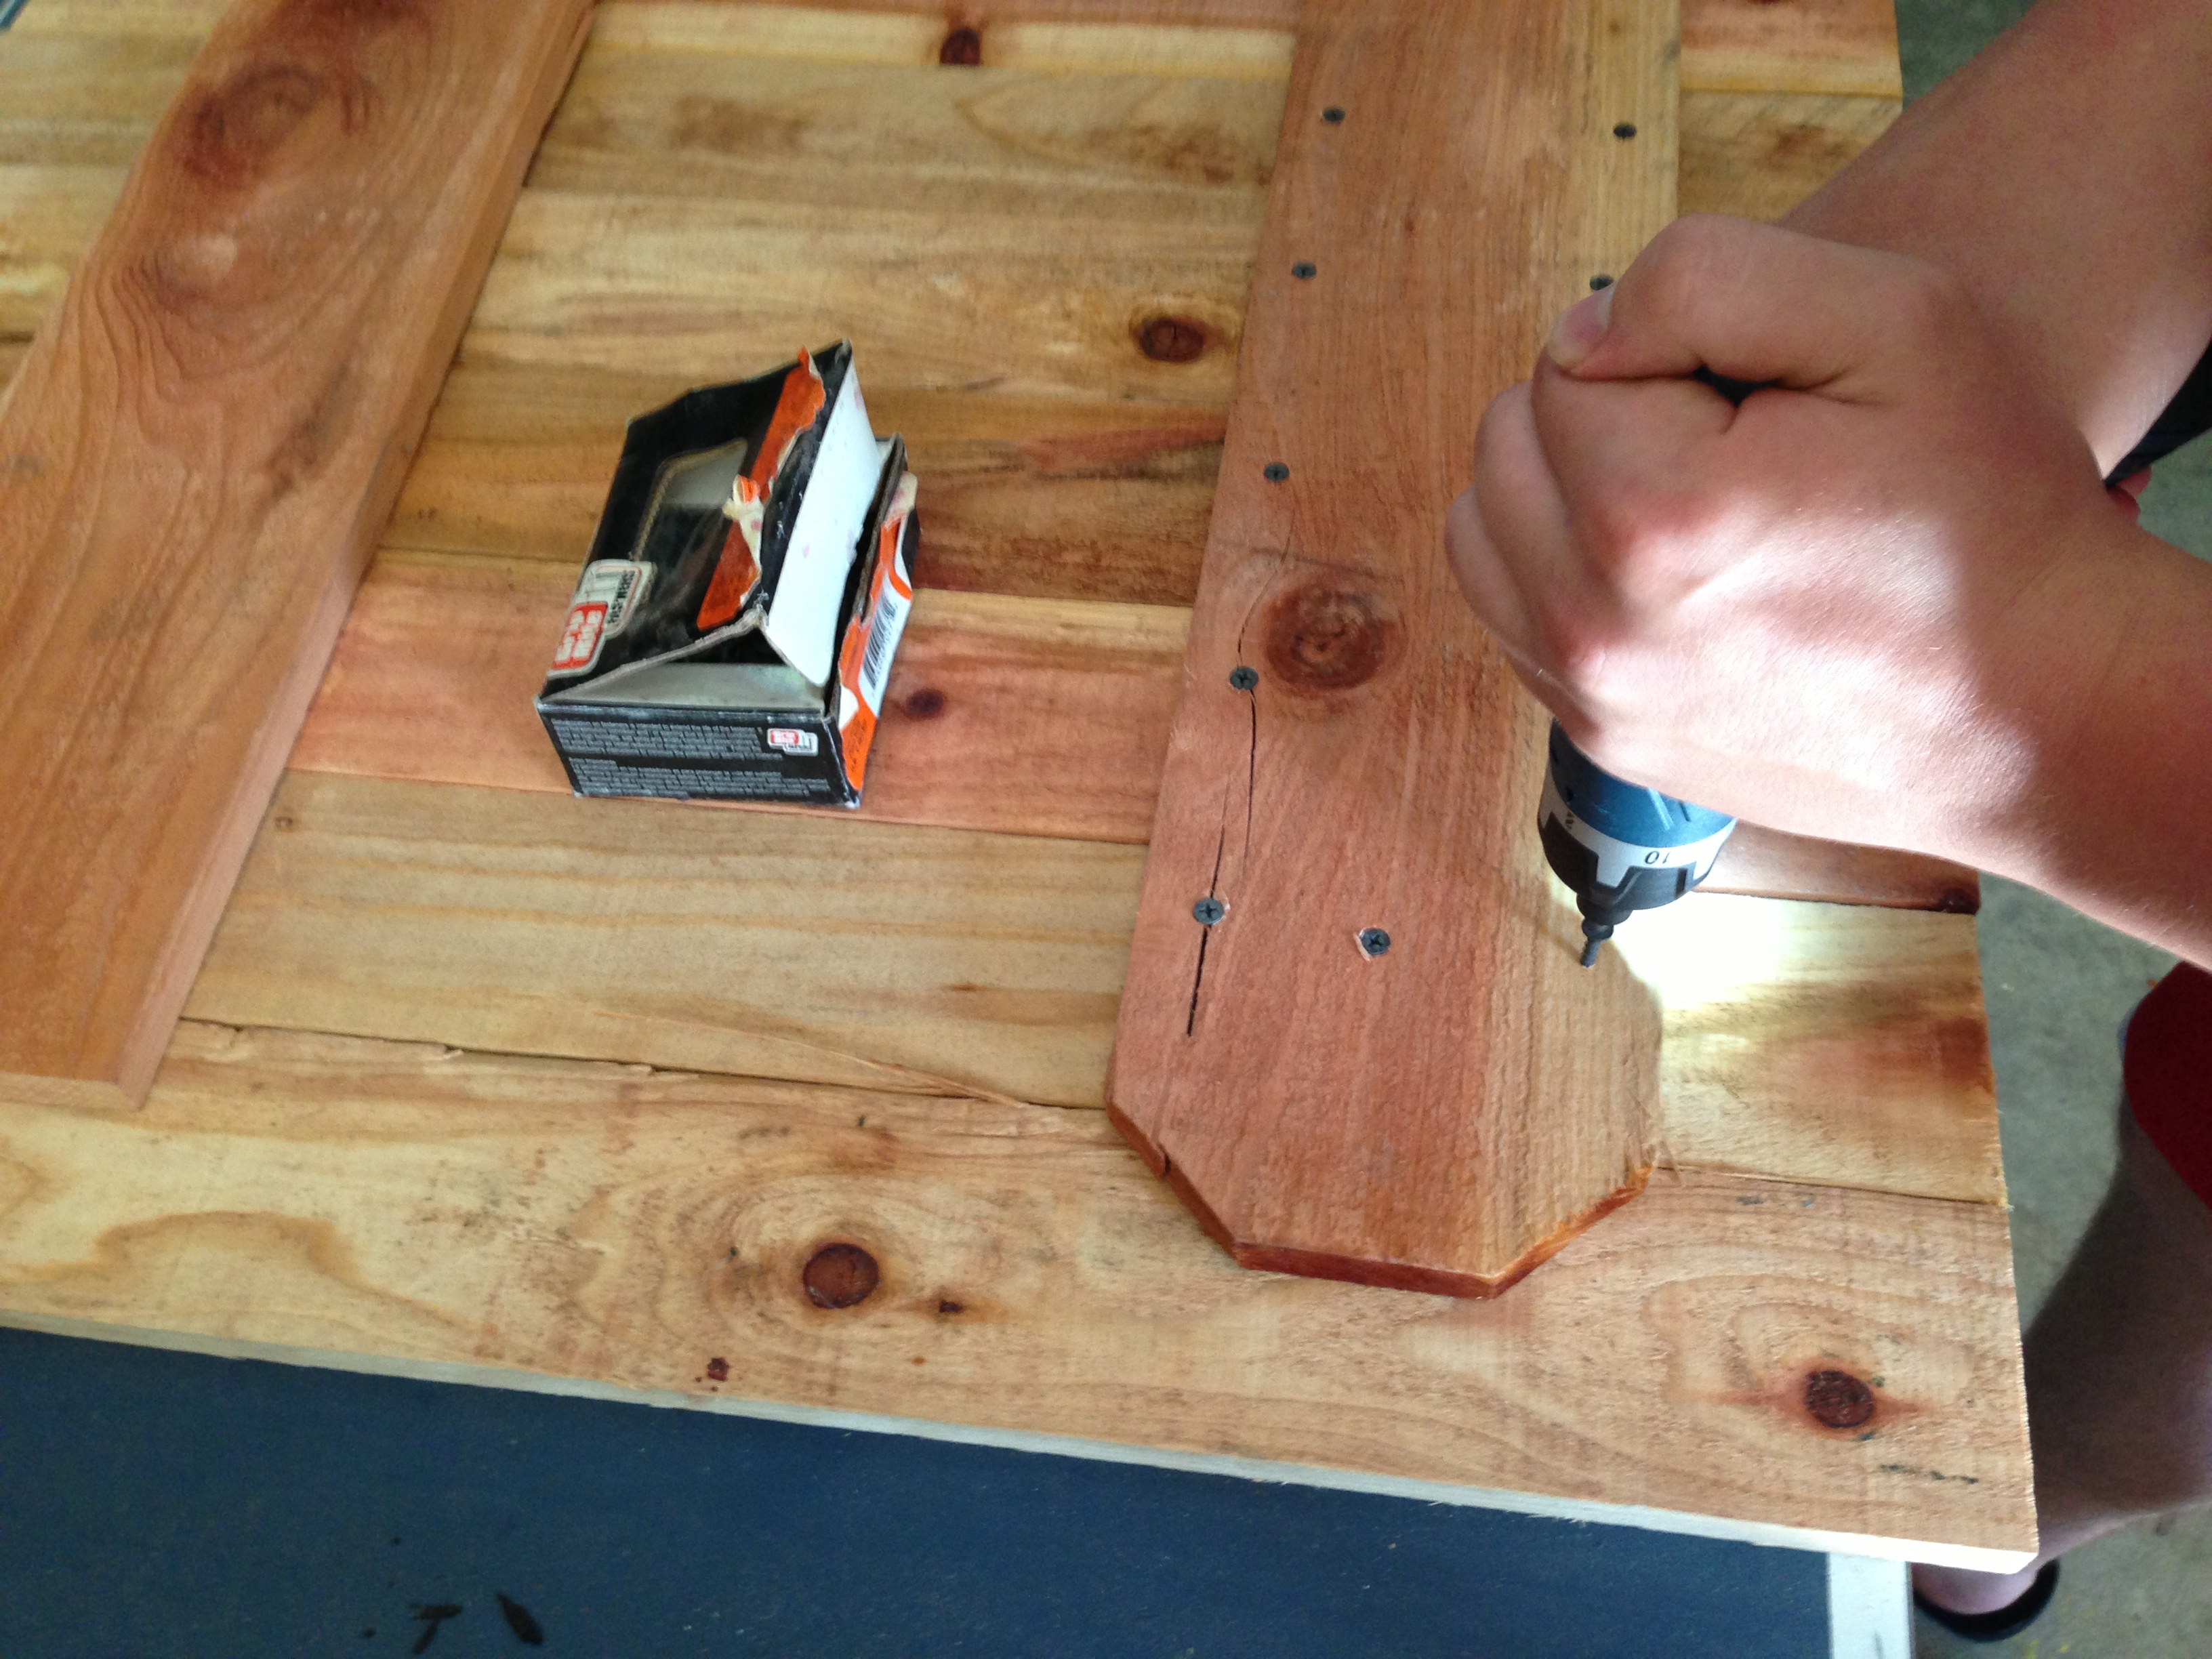
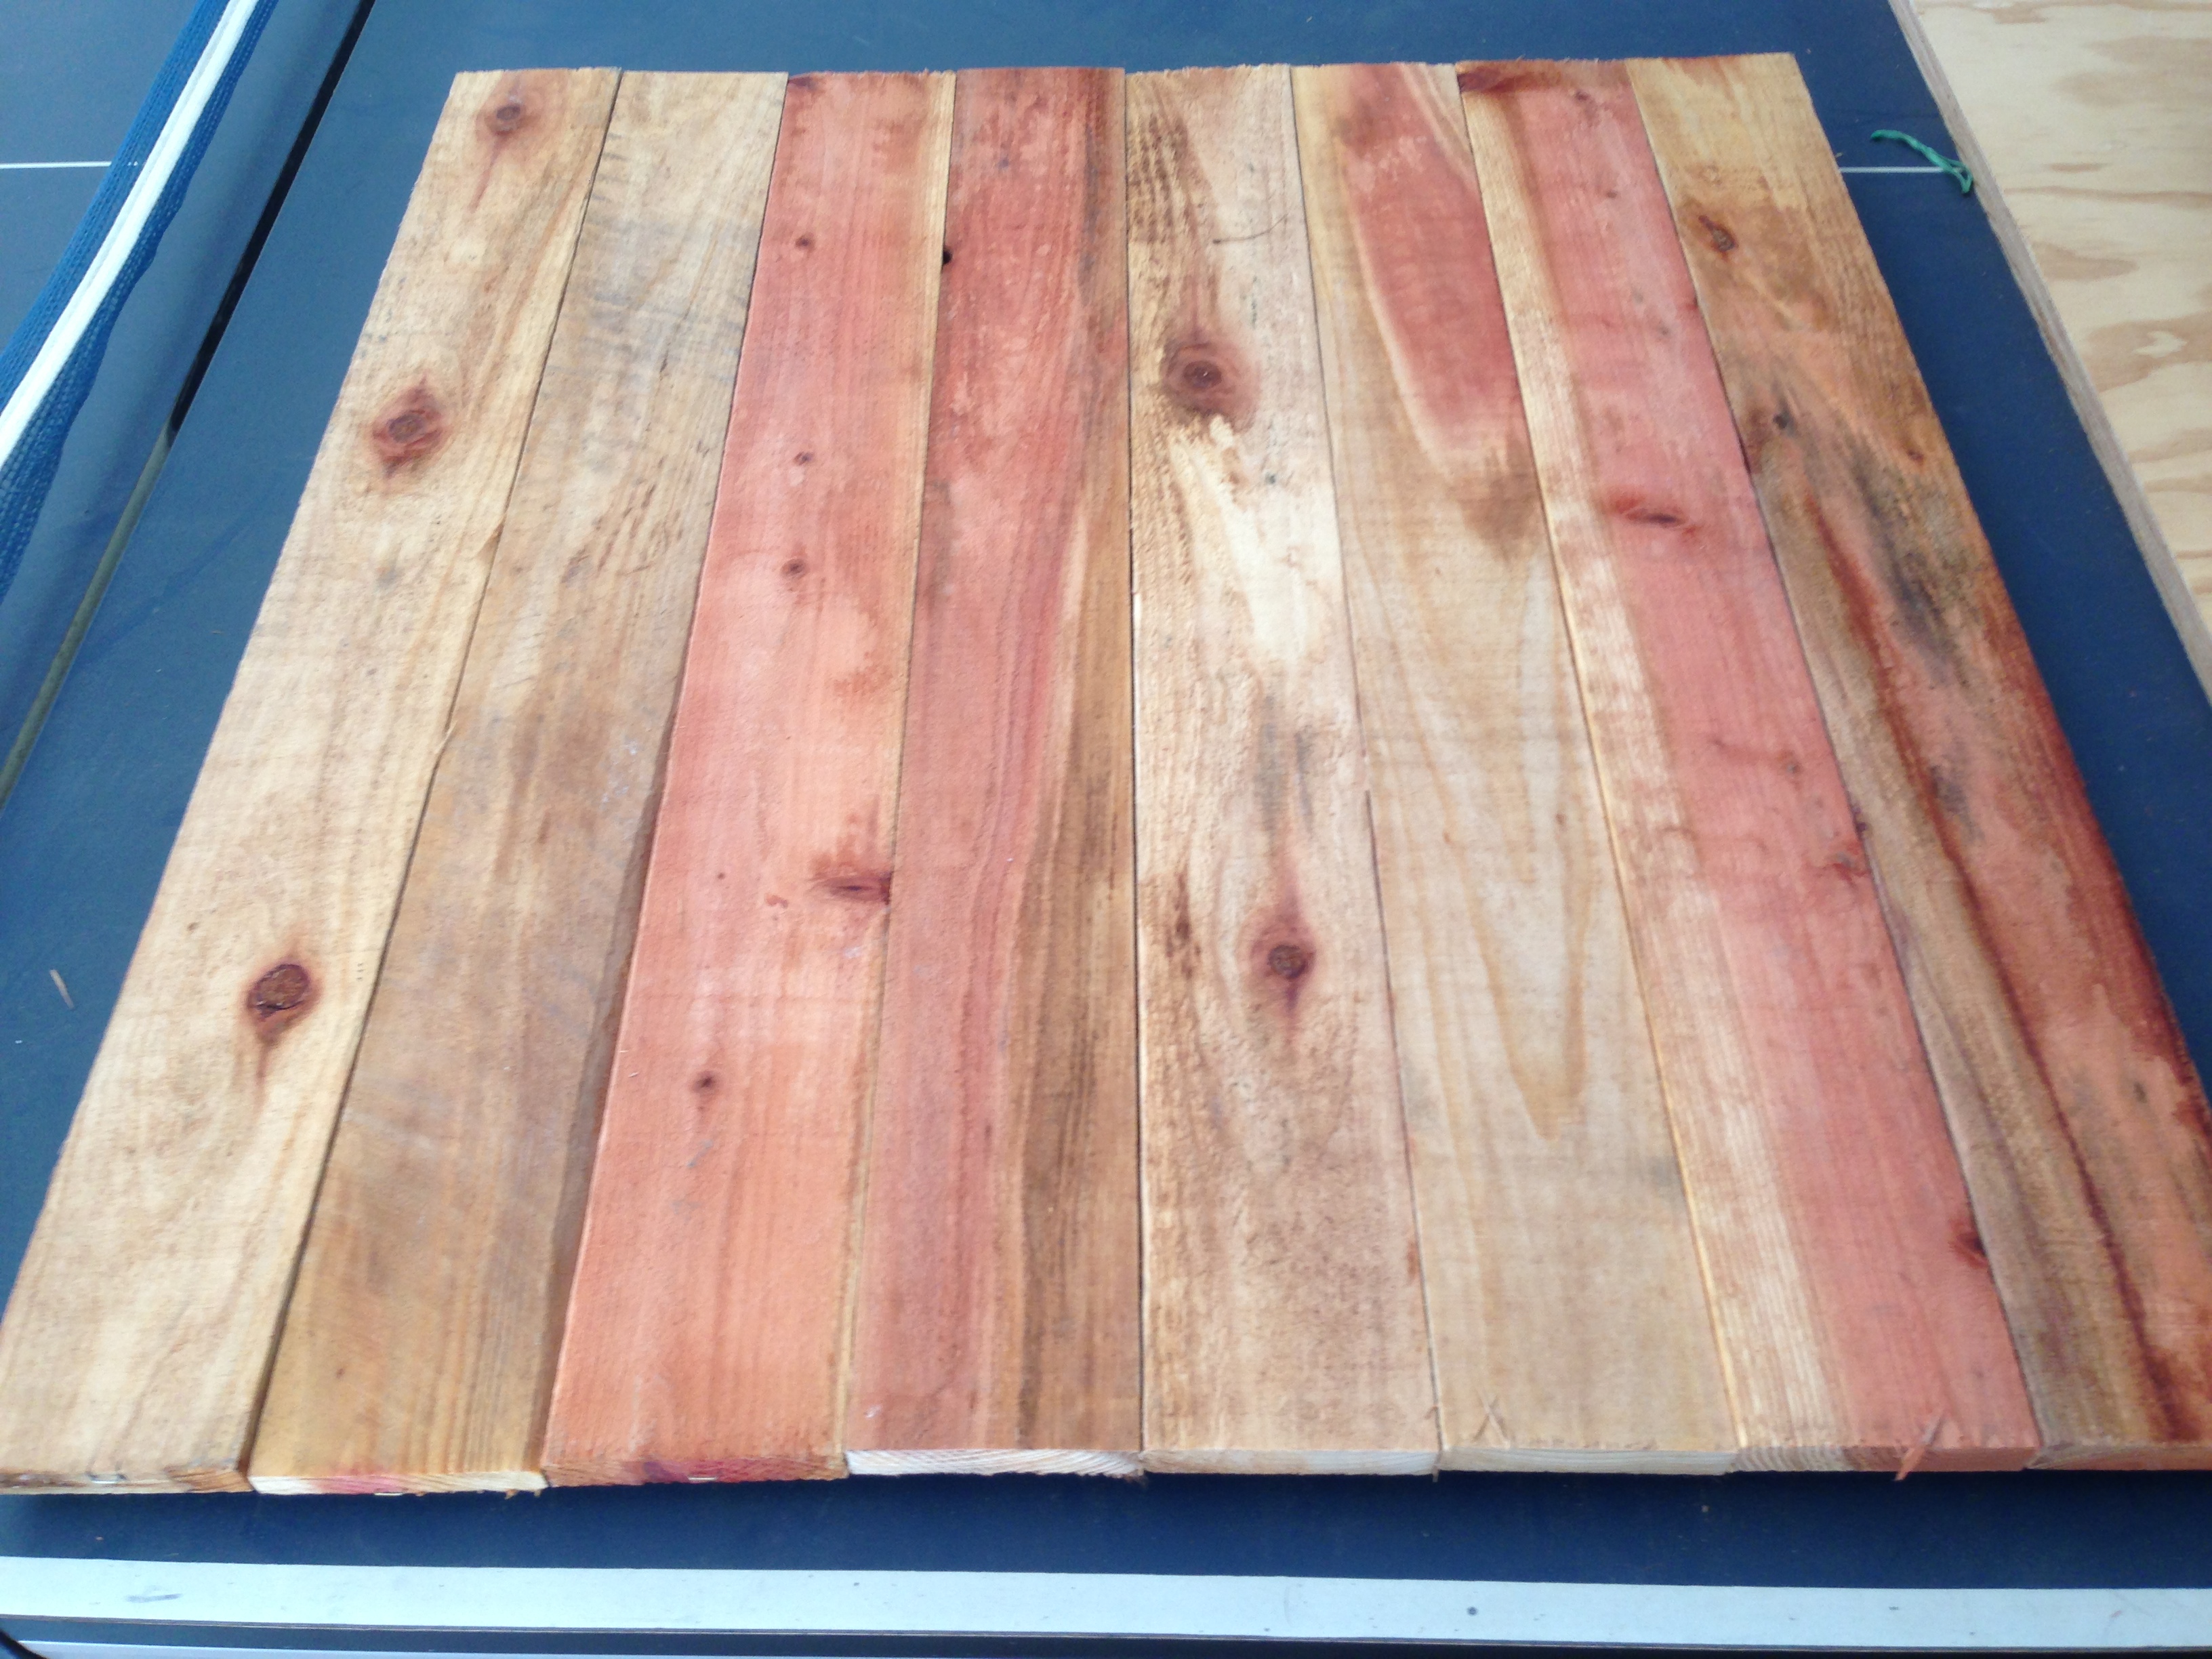
Next, using scraps of redwood fencing we lined up the boards and drilled them together with two horizontal fence pieces. (Making sure to use screws that were no longer than the wood width, to create a canvas on the opposite side without screw punctures)

butterfly fence art 005butterfly fence art 006

Then taking the metal butterflies and some tiny picture nails, we hammered them into the wood at different angles. Another neat trick was to bend the metal flashing to give the look of butterflies in flight.

butterfly fence art 007

Finally we screwed some picture hanging hardware and a plastic covered wire on the back.

butterfly fence art 008

Setting two wood screws into the strongest part of the fence and using a level to make sure the art piece would hang straight. Easy Butterfly Fence Art!

butterfly fence art 001 with graphic

How “Oar” You?

oar curtains and sac antique fair 018 watermark

Do you have a recurring theme or trend in your home? Your friends and family randomly give you lace, mason jars, wine decor, ceramic animals, what ever your love may be? This happens to me all the time, my obsession is admittedly the ocean. I figured by the time we can afford our coastal dream home, we’ll at least have all the furniture and decor we’ll need for it, right? (Or that’s my excuse for the hubby)

Hence when your dad randomly gives you weather-beaten boat oars he found in his barn. (Let the girly squeal of excitement subside…)

oar curtains and dog bed pillows 007

Now what to do with two boat oars?…Don’t want to spend money for curtains and curtain rods…Fab freebie, sea inspired curtains!

Luckily our house came with a studio apartment/guest house above the garage and this is where I can let loose, mess up and DIY to my heart’s content. (aka, Girl Cave) However I do try to keep my dog and sea inspired decor to a few spaces and a few rooms. (Like Martha Stewart would say, “regulating obsession… it’s a good thing”)

Firstly we used white wooden curtain rod brackets (left over from a failed DIY project). Installing them above each window in the Girl Cave. oar curtains and dog bed pillows 005

Luckily the previous owners left some curtains behind, (and after a good washing and ironing) they slid perfectly over the oars.

oar curtains and dog bed pillows 006

We had some left-over towel hooks we never used for the bathroom, and drilled them into the wall upside down.

oar curtains and dog bed pillows 013oar curtains and dog bed pillows 014

Then tied two knots on each end of a piece of rope, and looped the ends onto the hook.

oar curtains and dog bed pillows 012oar curtains and dog bed pillows 024

Instant curtains!

oar curtains and sac antique fair 018 watermark

Very cheap, sea inspired and incredibly easy update. What’s the theme, trend and/or obsession for your home?

Hope everyone has a fabulous and DIY-filled week!

Light it update!

We needed to shed some light in the guest studio/ my woman cave, I had found two amazing sea-side inspired exterior lights on sale at the Home Depot.coast light

Unfortunately the two light boxes set for these beauties weren’t routing to any wall switch. (This was only figured out after we had installed one of the lights)

Here’s how the conversation went:

Me: Look at how nice it looks! And I didn’t even electrocute myself installing it!

Hubby: Good job babe that does look really nice!

Me: I know right! I love the light it looks like something out of Coastal Living

Hubby: Yeah it does, except honey, how do you turn it off? 

I was so deflated and ready to return the lights. I was even walking around HD forlornly with my two little lights in hand contemplating, whether I should give them up or re-wire my entire guest house… When low in behold, an “angel” in an orange apron named John, came to my rescue in the electrical aisle and found me this…

oar curtains and dog bed pillows 001

My $3.99 push button switch solution, John even walked me through the installation and attached them to the lights while in the store. (I think every HD needs a John in their store…sorry for the pun) Here is how it looks from the front and back…

oar curtains and dog bed pillows 011 oar curtains and dog bed pillows 010

Now we’re not licensed electricians, which is why it so important to read the instructions for both light and the switch in order to safely convert a light. It also helps to have a “John” in your corner who happened to be a retired licensed electrician.

All in all you’re going to need a drill bit the same size as the push switch’s base. Drill the hole in the light base, for where you want the switch to be, then secure it with the nut and washer that comes with the switch. You will need an extra plastic electrical connector/nut to connect one of the black wires of the switch, to the light’s black wire. Then follow the instructions that comes with the light for the actual light install, if all else fails, have a licensed electrician install it if you’ve already had a bad experience with electricity. However adding a pull chain or push button switch is an easy and economical solution to your lighting dilemma…Done!

oar curtains and dog bed pillows 003

Pillow Talk…

In a stroke of good luck, and timing we were able to score some Hampton Bay deep seat cushions at a great deal! I’d been eyeing the outdoor furniture at Home Depot for the past several weeks, and hoping for end of summer sales. Normal price per two cushions $59 each…Ouch!

oar curtains and dog bed pillows 002

Finally after weeks of waiting we found our Hampton Bay cushions in cream for $33 each. Follow that price with a gift card and they were almost free…Yay! (Again, let the snoopy dance commence!)

Now here they are in their new home…

oar curtains and dog bed pillows 043

oar curtains and dog bed pillows 030

We knew outdoor cushions are pretty sturdy and stains can be easily wiped away. Also the cushions are incredibly comfortable. Luckily we found two little decorative pillows to tie the gray bench seat and yellow/cream cushions together. These came in a two-pack at Marshall’s for $16.99.

oar curtains and dog bed pillows 038

I was also playing around with alternative fabrics for re-upholstering the bench seat. Here are the new cushions against tan colored linen. (Above) However we’re still not sure what our new color scheme will be for the kitchen. Until then we’ll hold off on the custom pillow and cushion covers. (Admittedly I need to hone my sewing skills first.)

All in all a very sweet deal and very simple update!

Wow! Week day posting!

Featured on the Budget Savvy Bride

budget savvy bride

I’m just tickled and so grateful to the Budget Savvy Bride for featuring our DIY wedding today! Giving the majority of the DIY credit to our parents, we are very grateful for their hard work! We want to thank everyone for helping us create a beautiful budget friendly wedding! Thank you the Budget Savvy Bride for featuring us!

Little Car…Big Dogs? [And FREE PRINTABLE!]

Taking a break from house projects, let’s talk about summer travel and camping! There are still a few more months left before autumn comes! Perhaps your big summer vacation is already done? Maybe you’re looking for budget friendly weekend jaunts? Are you taking the dogs with you?

dog bed 072

This post includes our printable checklist for camping and travelling with dogs.

Don’t have a truck or SUV?  This post includes how we space save and pack all the camping gear and two big hounds into one little car.

Despite having two big dogs and the ongoing home improvement projects one would assume we had a truck?…NOPE! We own two little cars; one as a commuter and one as our “Cruck” (a car that thinks it’s a truck).

Instead we’re perfectly happy with the “less is more” approach (especially as gas prices go up). Like most dog owners, we’ve also found camping to be the best economically for overnight trips. However it can be tricky to fit an entire camp, us, the dogs and two enormous dog crates in a little car. Therefore we’ve had to master the art of camping and traveling with very little space. No roof rack, no trailer, all the gear in the car trunk! Here’s our gear list and packing tricks…

First all the camping gear laid out…

dog bed 083

Now here’s all the gear fitting into this tiny little rubbermaid…(The kind that slides under the bed as storage)

dog bed 081

A great space saving camping tip is to take a back packers approach to cooking. We bring foods that don’t require a stove or ice chest, and can be boiled like spaghetti, and soups. (Which are fabulosuly inexpensive for the traveller on a budget) Also we use backpackers cooking utensils, such as the GSI kits, and Jet boil heating system, which allows us to ditch the big propane camp stove. If we want grilled or fried we use the campfire.

Need more details? Check out our free printable camping gear checklist! 

printable camping list graphic

Printable camping list

As the checklist includes, here are the dogs’ gear and first aid kit

dog bed 087

Now for packing the car…

dog bed 066

We normally pack away the two foldable dog crates on the bottom, and place the camp gear on top.The tent packs neatly to the side and if we want, we can store away a small cooler towards the back. This leaves plenty of space for  food, sleeping bags and our backpacks of clothes to sit atop the rubbermaid. As for the aerobeds, pillows and our porta potty…(Oh yes if you looked at the checklist you’ll see those items listed as well.)

These easily stow behind the front seats…

dog bed 063

The dogs foam mattress and blankets go right on top…leaving them extra space to stretch out…

dog bed 069

dog bed 078

Luckily once they’re harnessed and belted in, they curl up behind our seats for long naps…Oh yes, like big babies, a car ride puts these two to sleep.

Ready for the weekend! Time to hit the road…We have lakes to play in and hills to hike! Any good packing strategies? The pups want to know!

dog bed 076