“Trailer Talk” Makeover Series: The Green Machine…The Clean and Safe Machine


 Over the last couple weeks we learned some valuable lessons about buying a vintage trailer…(even one that was well loved, garaged, and in good condition)… 

1. Towing safety is top priority! 

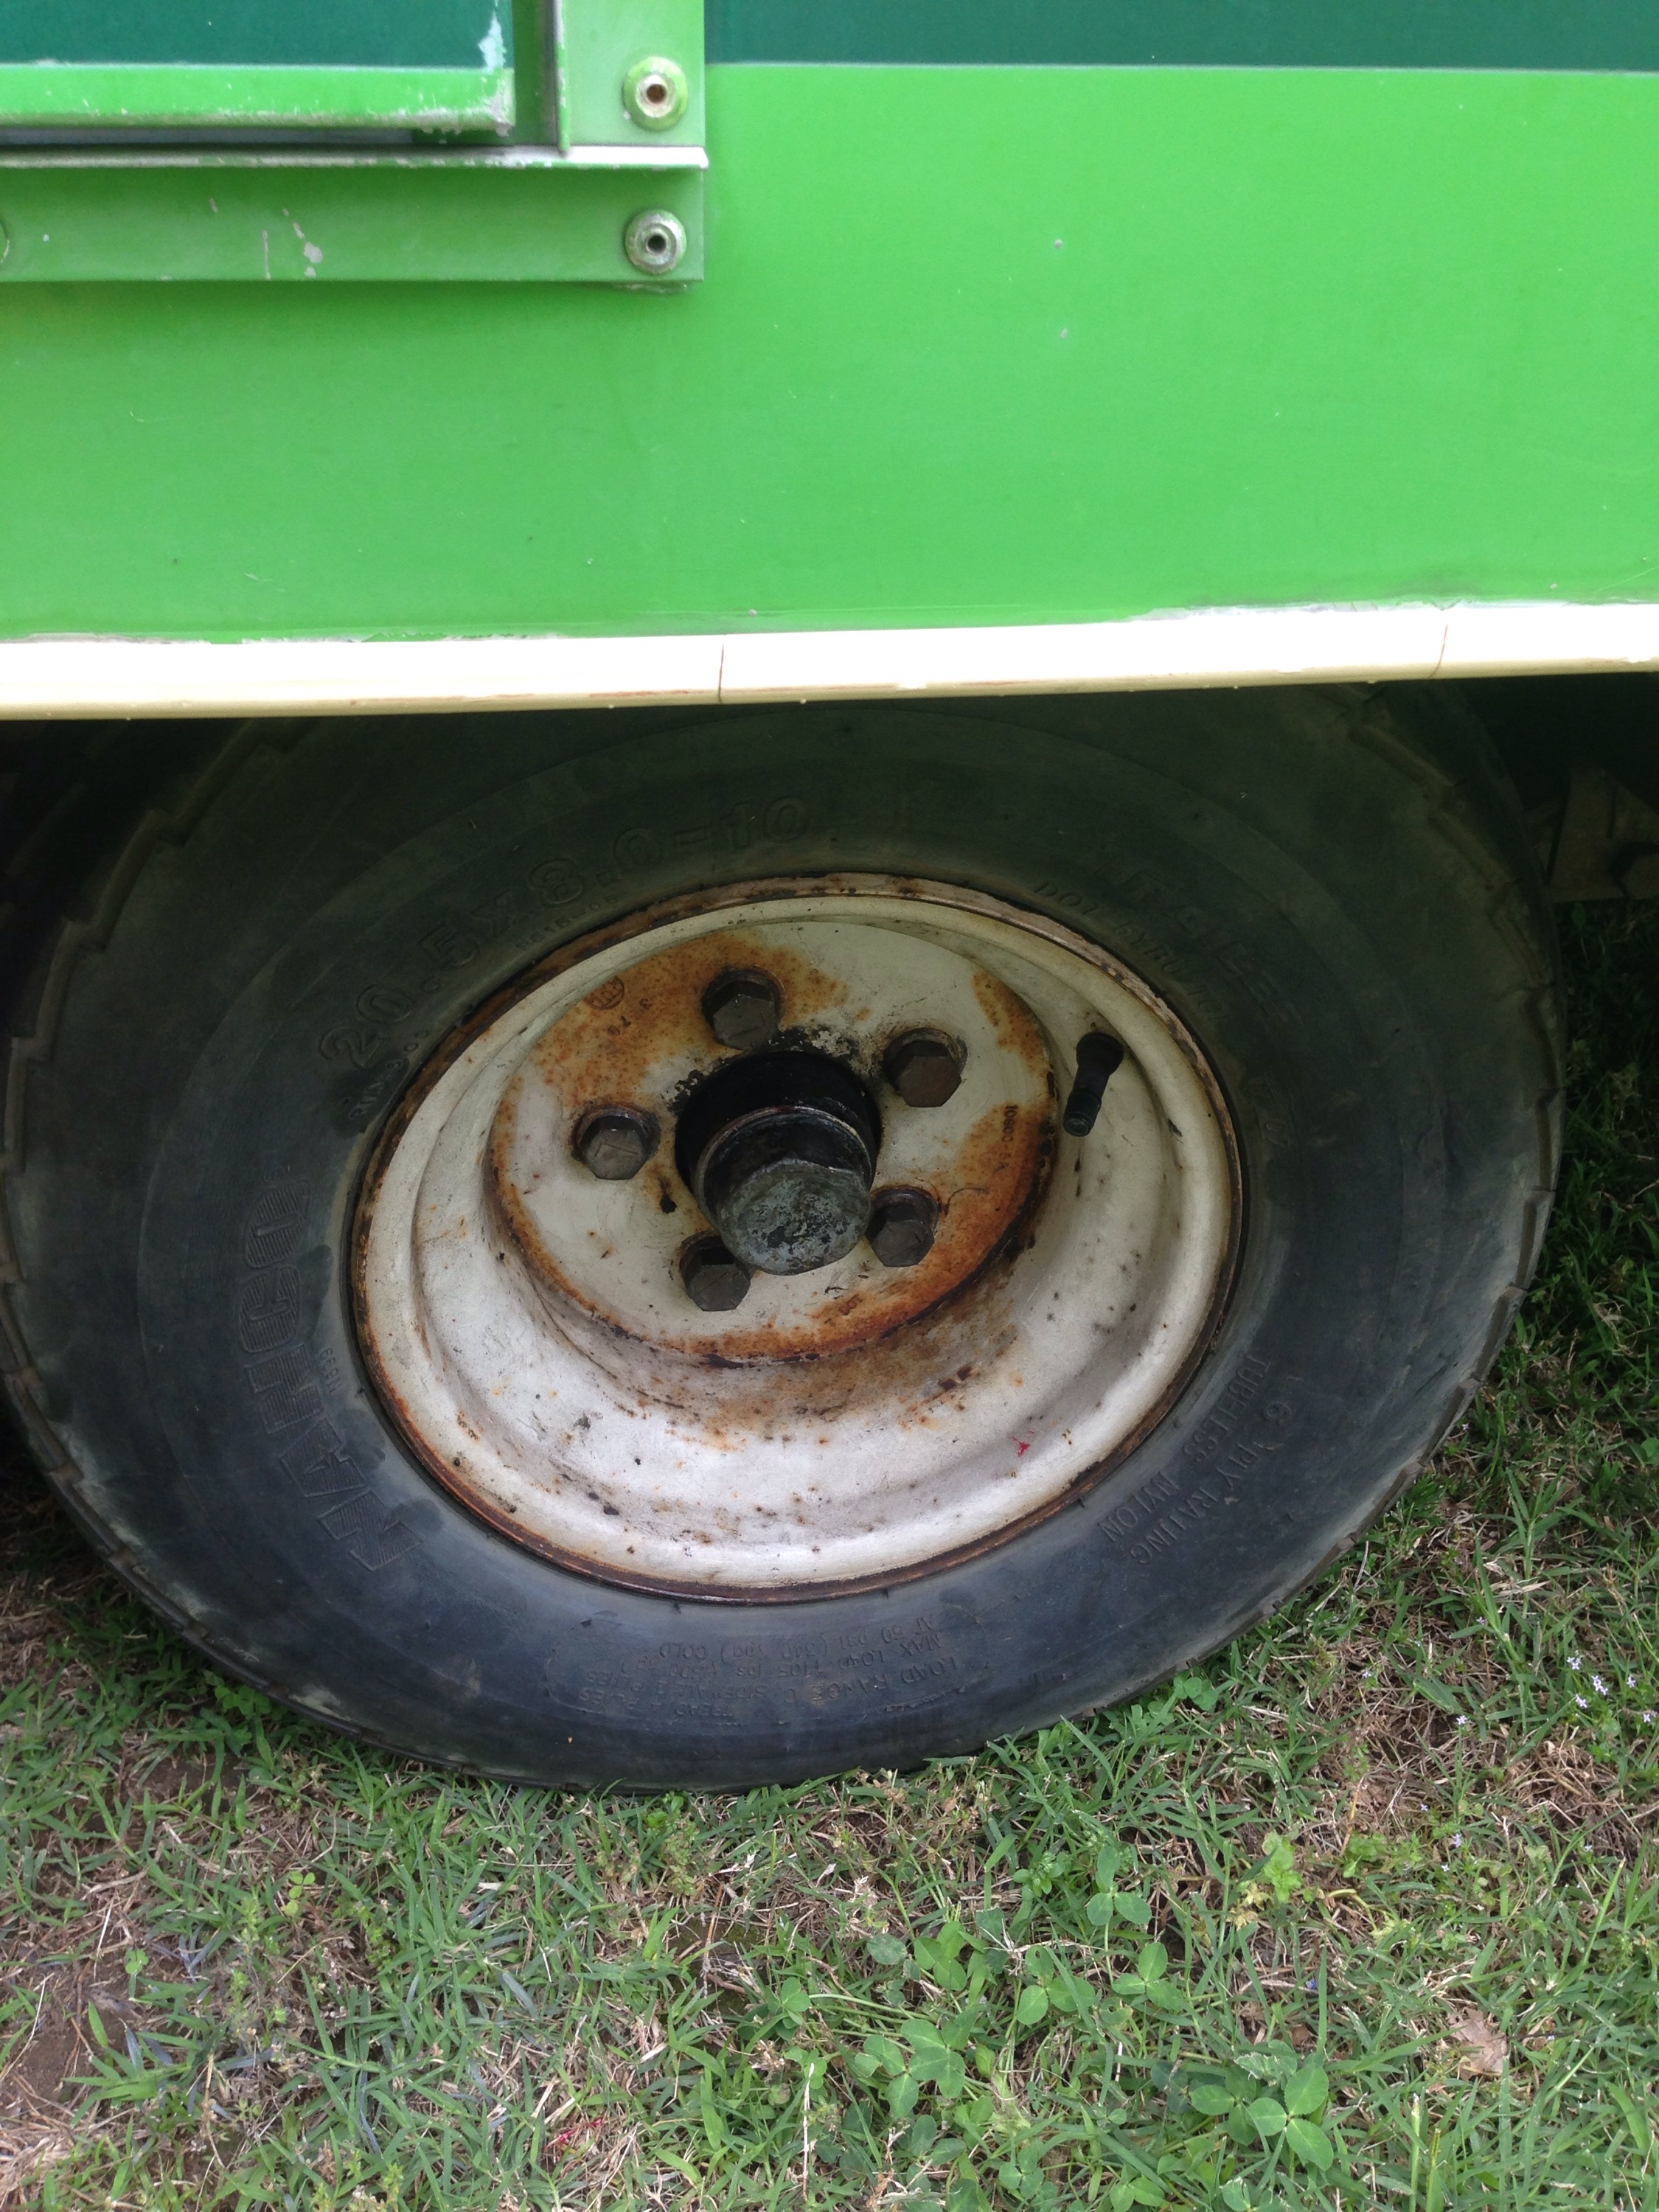
2. Unless it was plastic wrapped for its entire existence, there will be road grime and deep cleaning to do. 


Bleh๐Ÿ˜

We’ve been trying to check these two very important items off our list and lets just say progress has been slow going (partially in part to my right wrist being out of commission after a running accident)

Now towing safety first…Which can mean several checklist items; trailer frame, tail lights, wheels and bearings. 

We mentioned in our last post in the series that our little Green Machine was off to be “lifted”. Which turned out to be more important than we anticipated, and found out there were several cracks in the trailer frame. ๐Ÿ˜

We originally needed the trailer lifted a few inches to clear our steeply angled driveway and to potentially add larger wheels in the future. 

However our family friend found several cracks in the trailer frame to which we innocently overlooked. He repaired all the cracks and Green Machine is sitting a good three inches higher! Whootwhoot!๐Ÿ‘ 

Next were wheels and bearings to check off the list. Big thanks to my pops, he taught us how to repack the wheel bearings and surprised us with newly painted wheels while at work one day! So pretty! 

Last up with safety, driving our little Green Machine home we noticed the right indicator light would blink at the same time as our left. Also the right brake light was out. (Luckily for us, in California you only need one working brake light to get home ๐Ÿ˜ณ) However after much fiddling, bulb replacement, and testing we’ve decided we’ll need to rewire the trailer.  

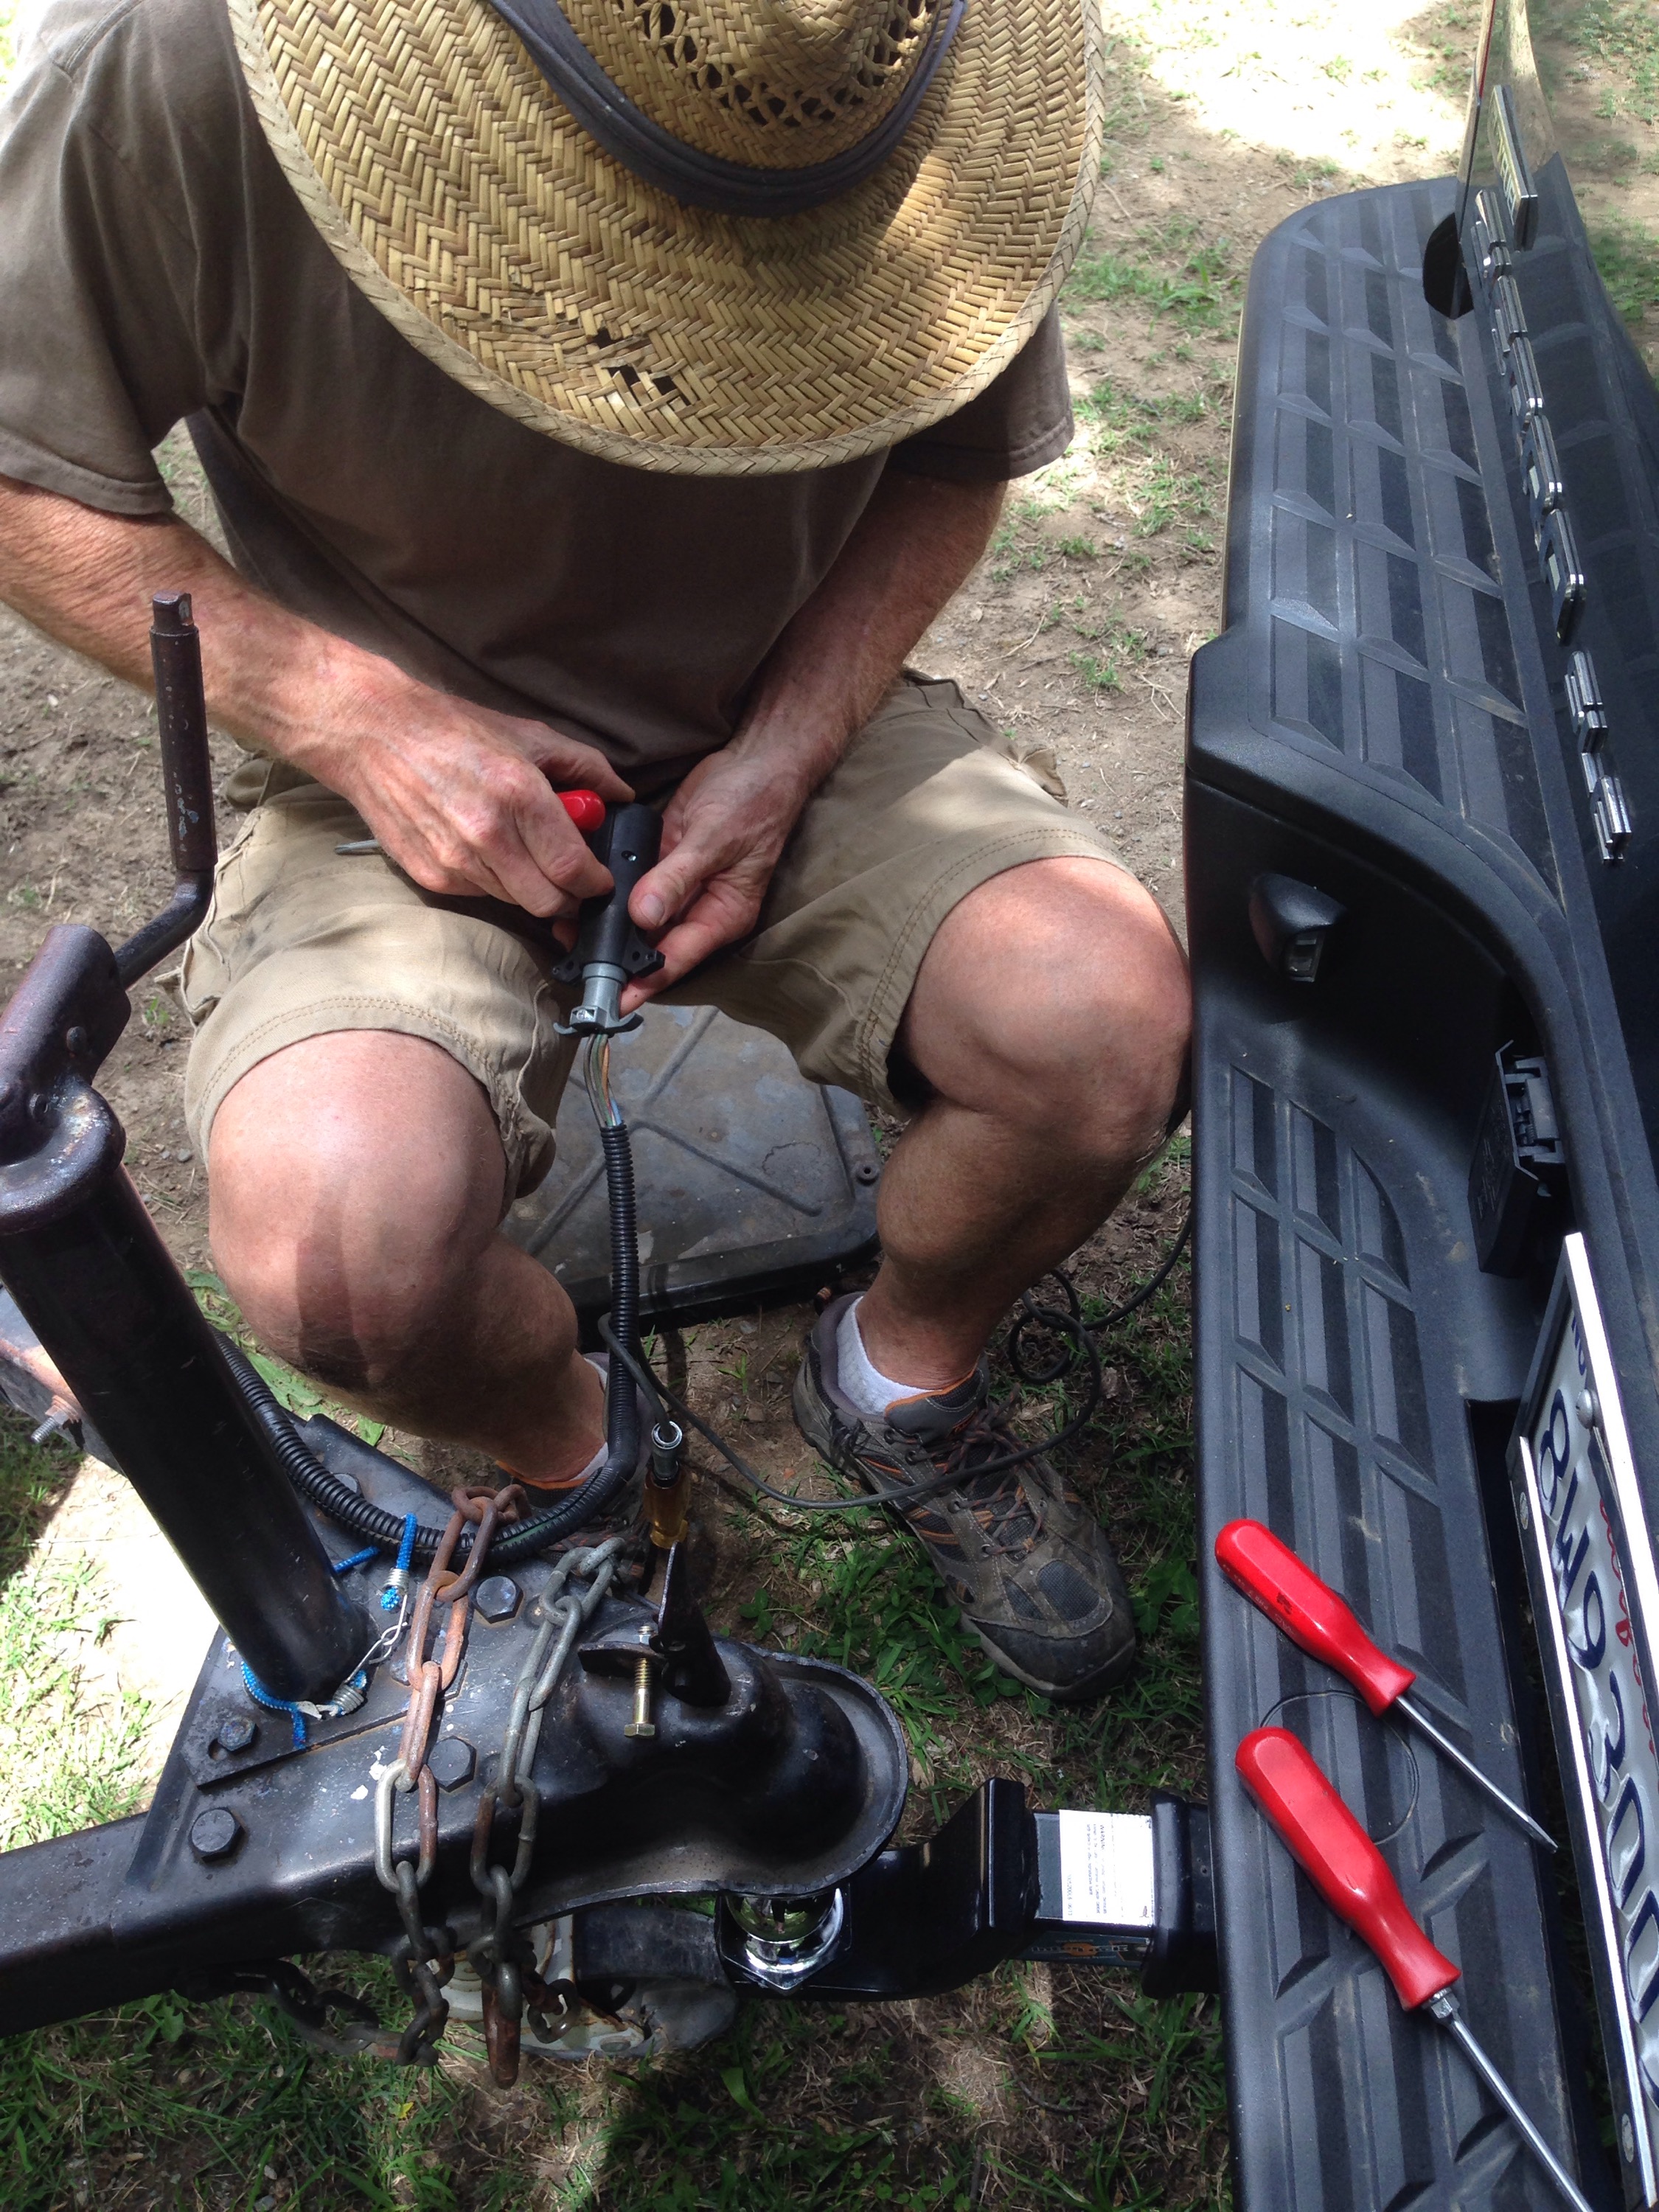
 This also means two brand new, matching tail lights. (Rather than one original and “Mickey moused” one) Tweetys RV and Trailer Supplies online had new (nearly identical, #342) to the original tail lights. These should be coming soon and we’ll be learning the ins and outs of rewiring a trailer. 

As for cleaning 37 years of road grime… (And mystery stains)


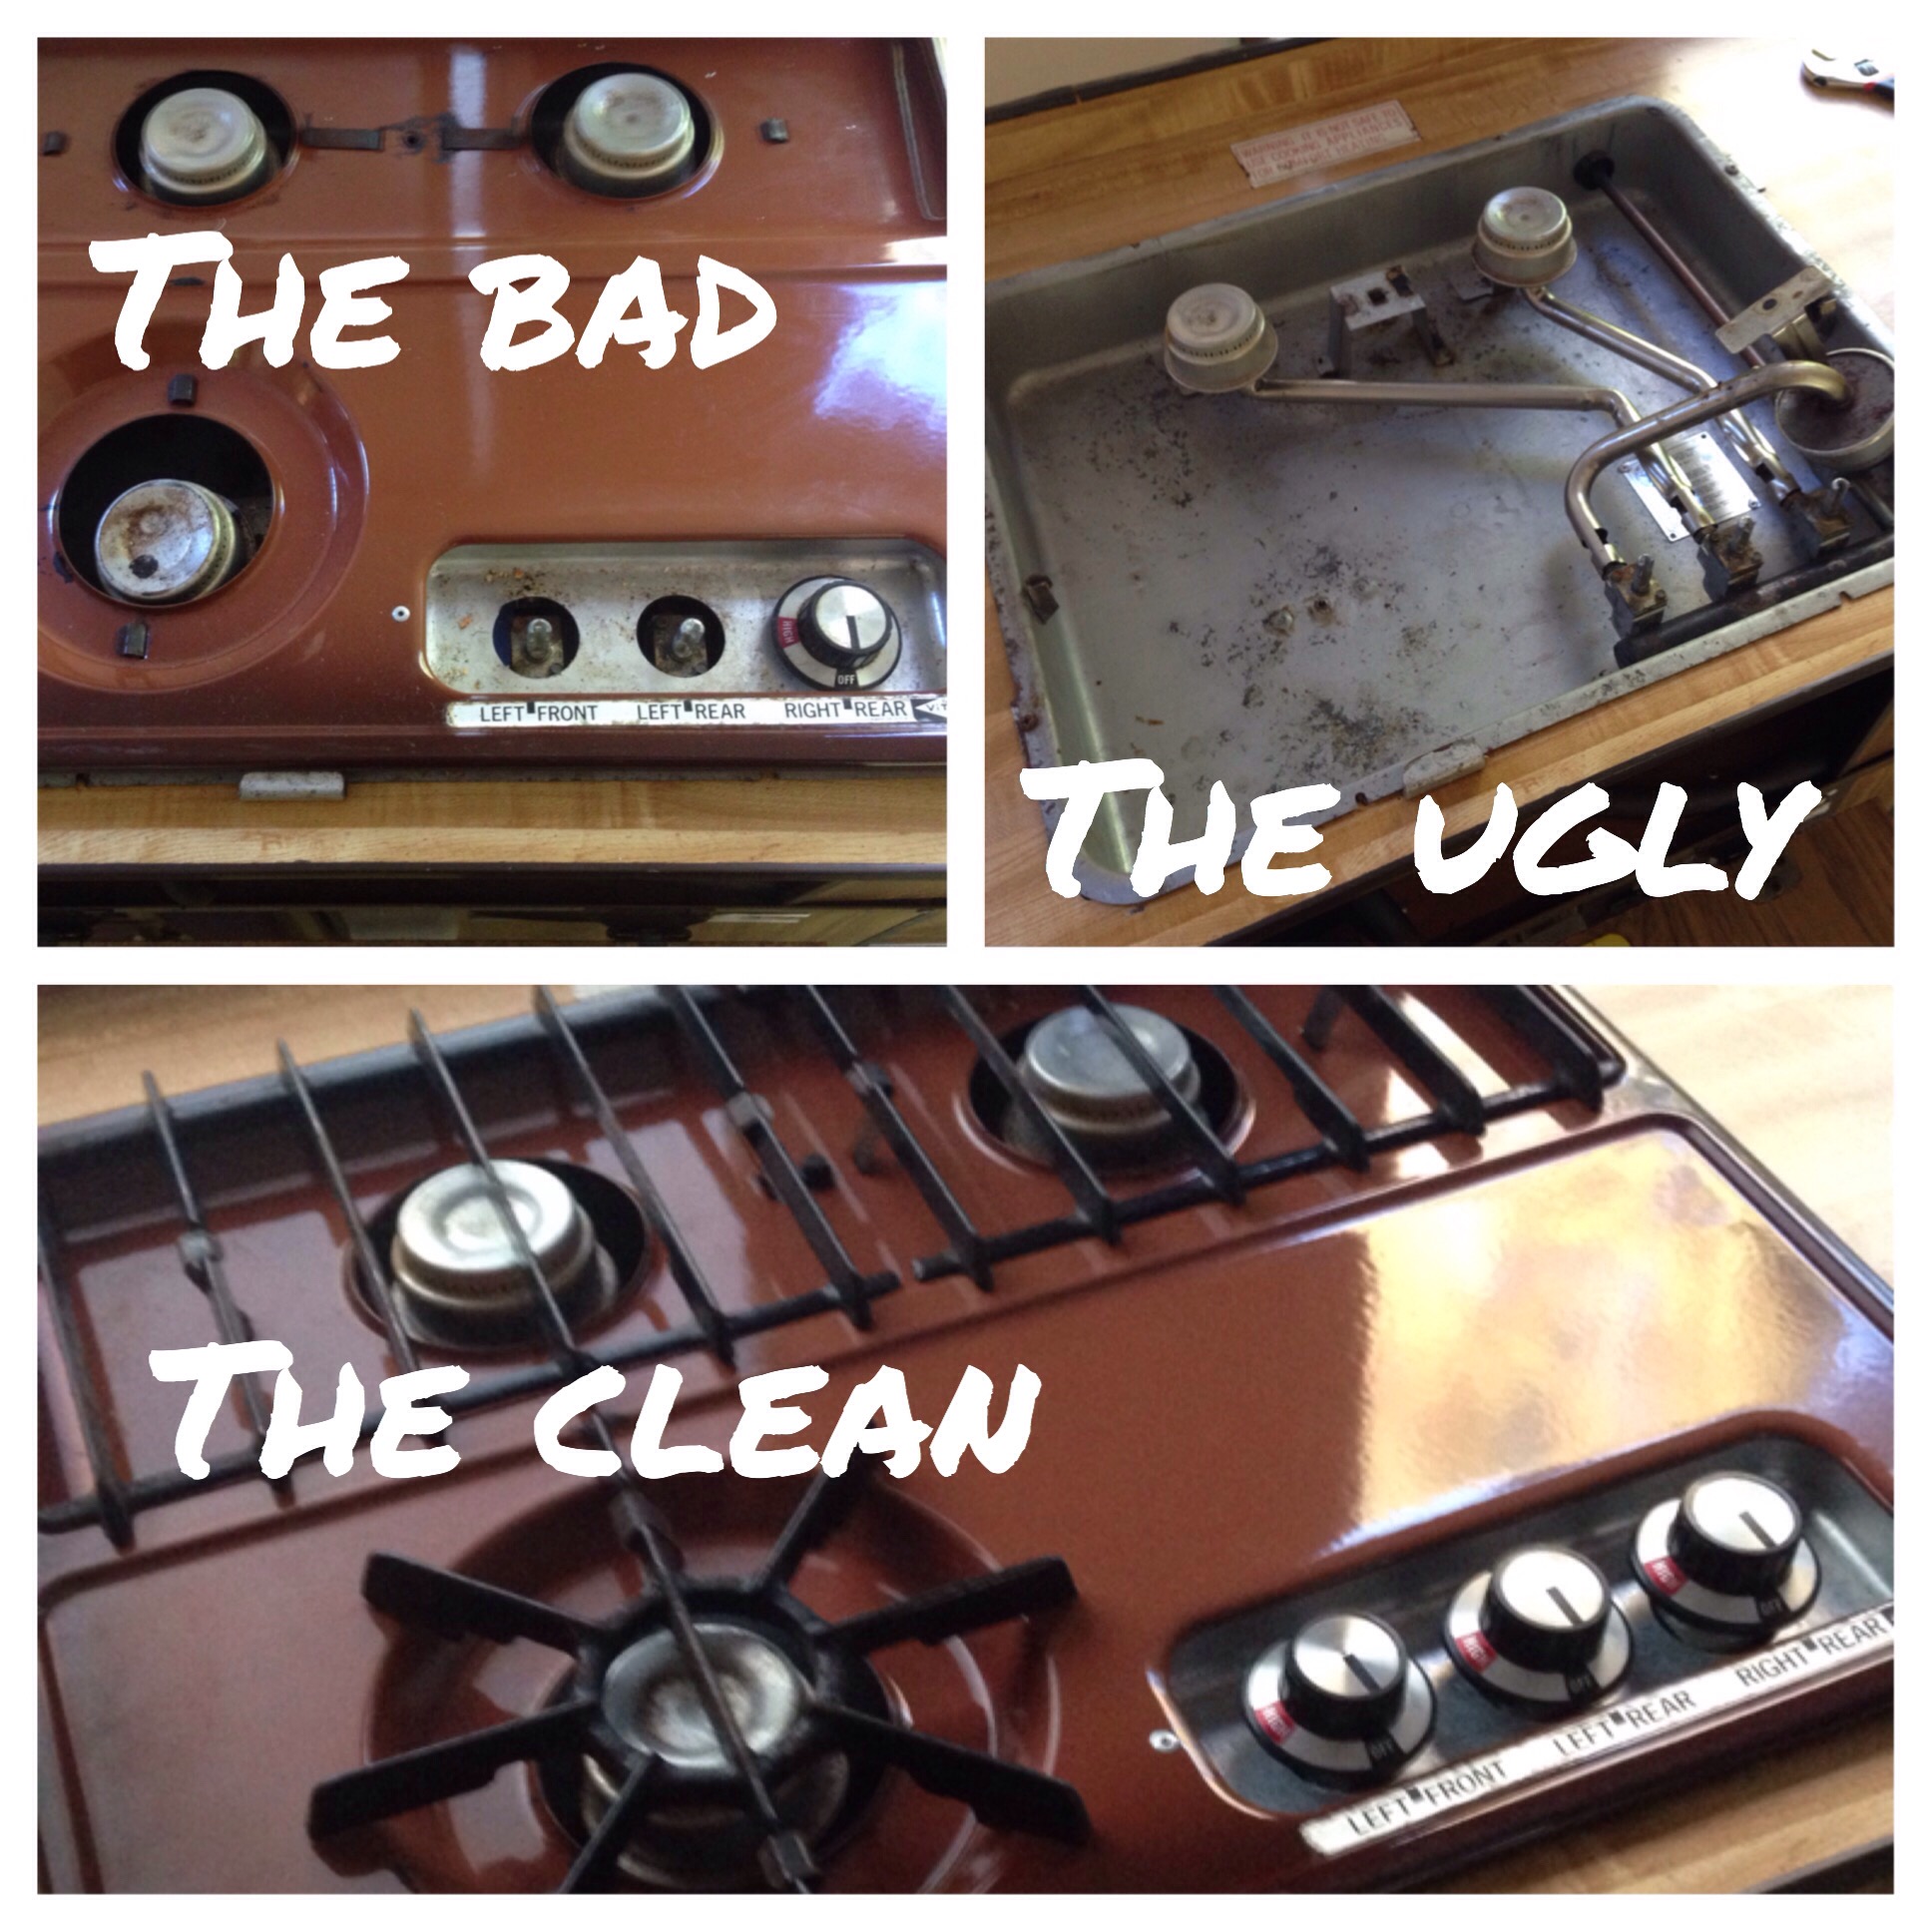
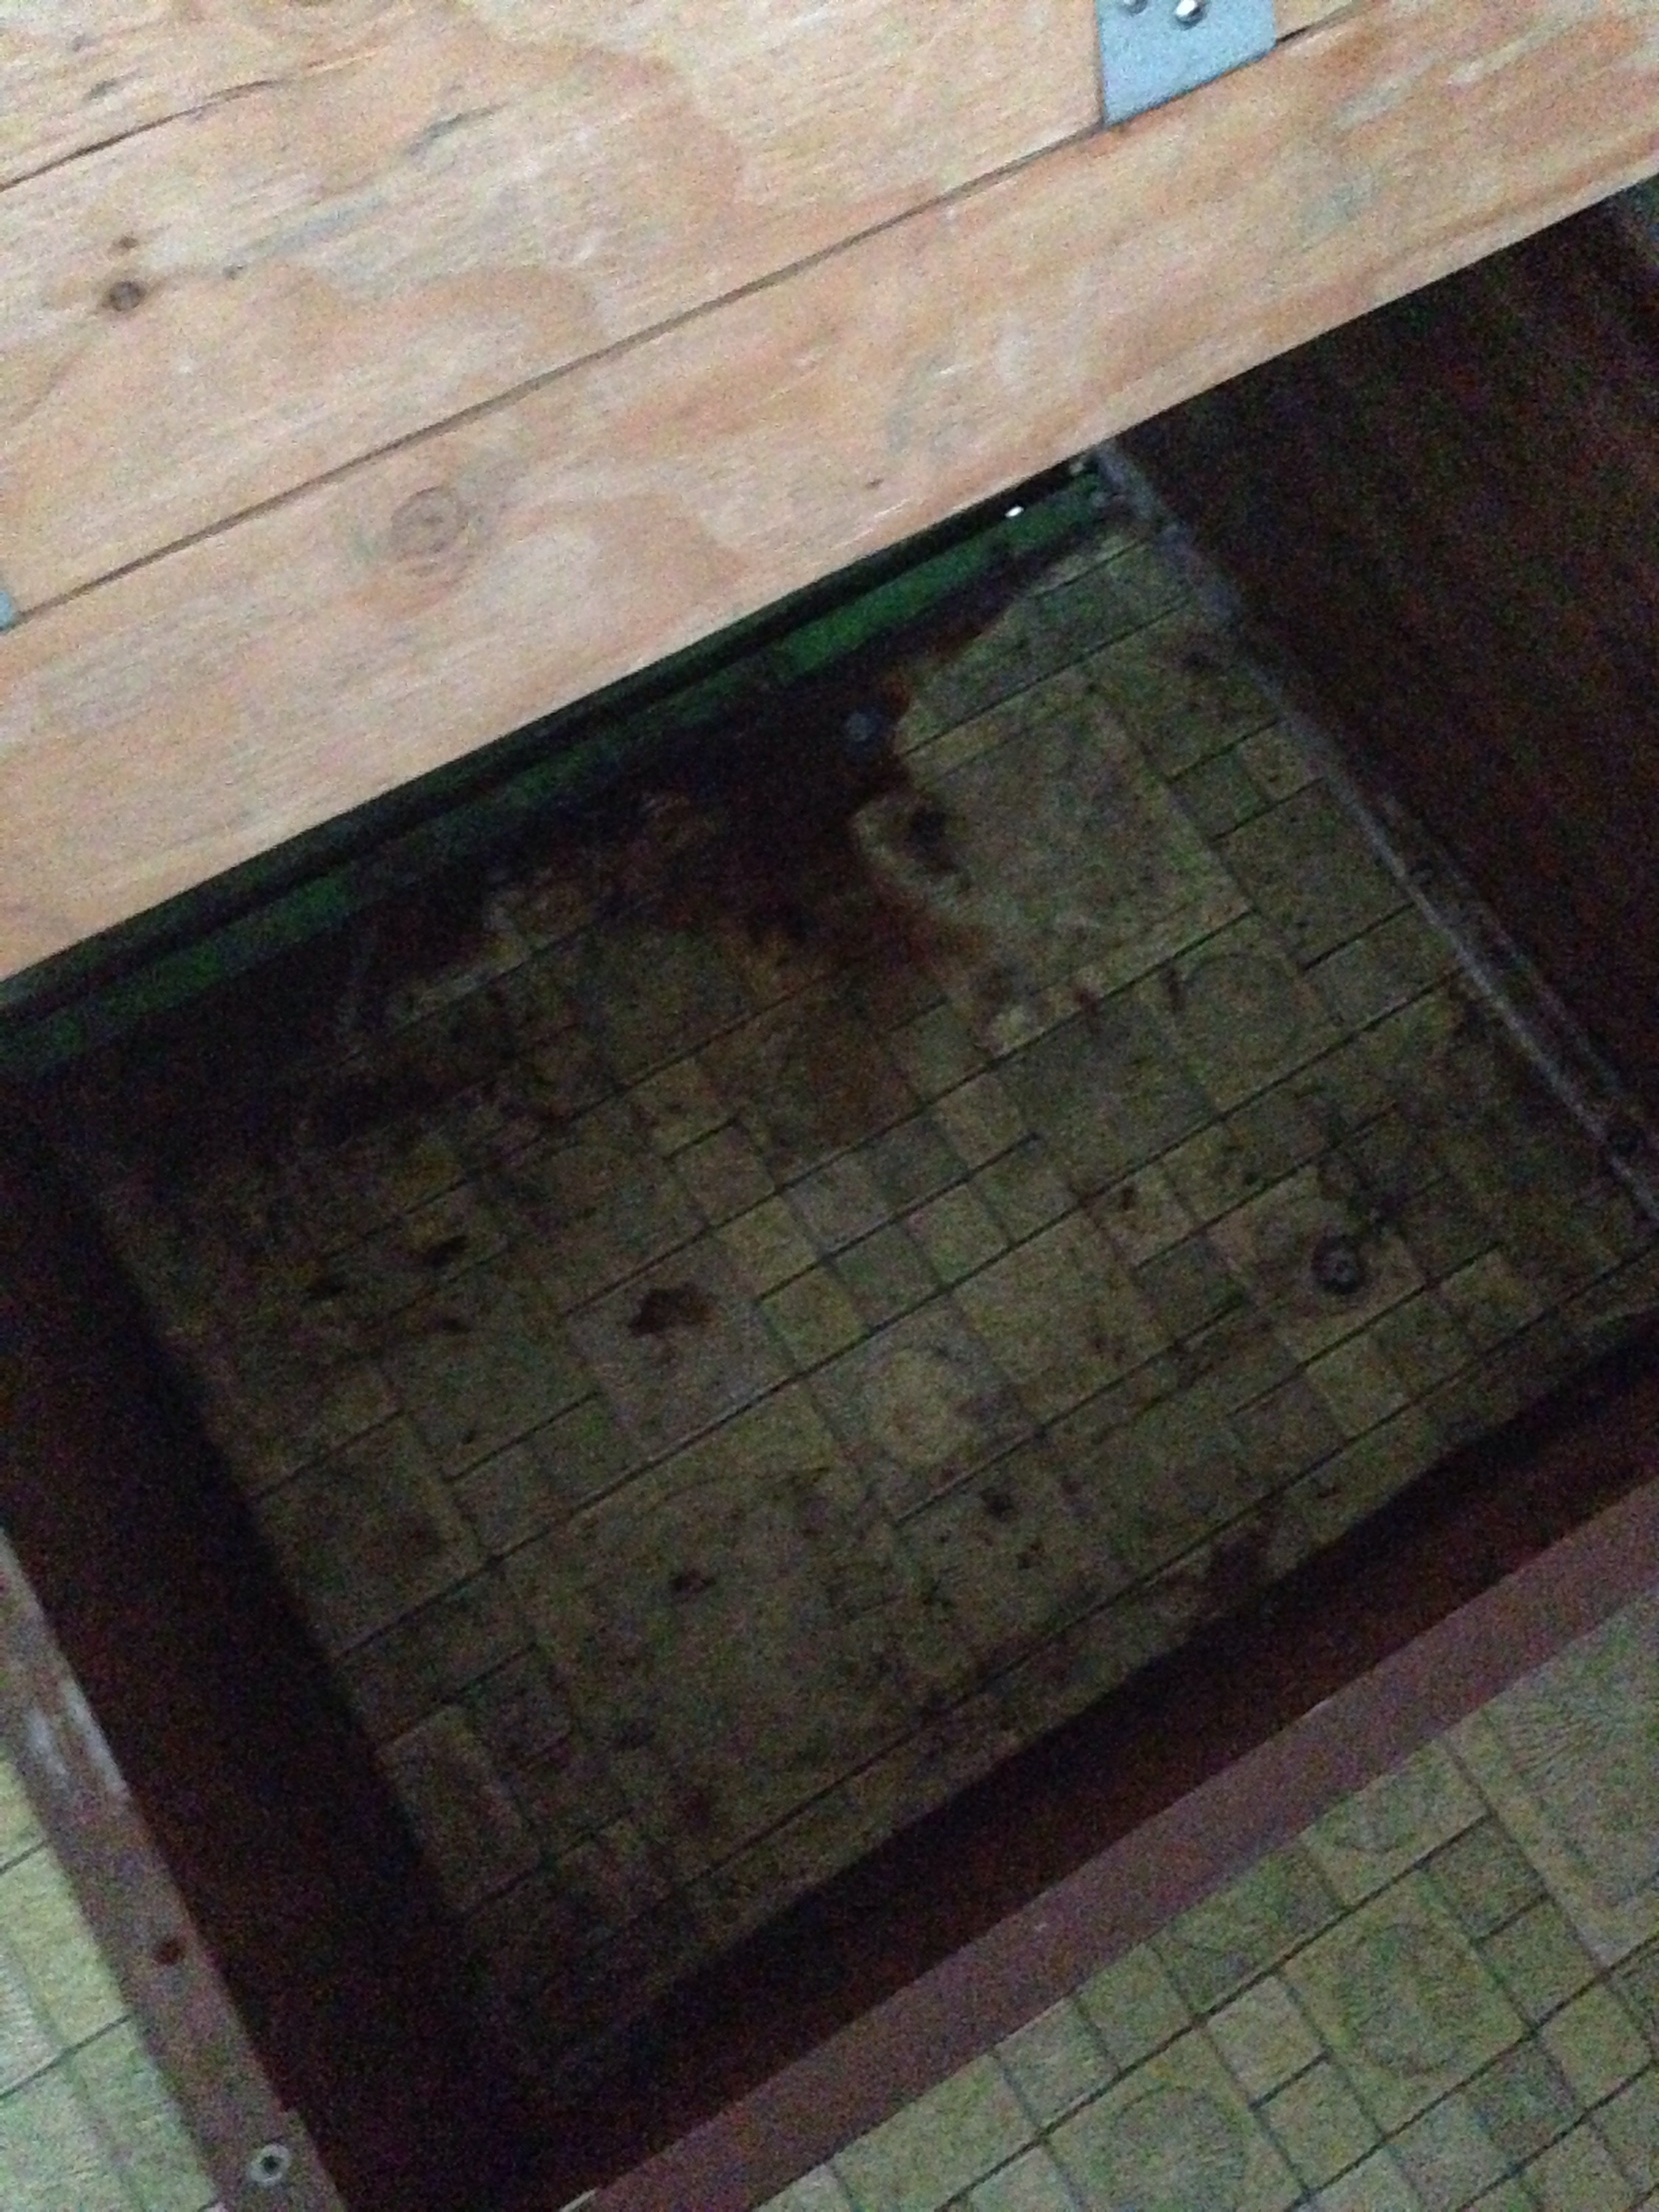
We’ve found cleaning not only is therapeutic, but necessary for figuring out the trailer’s anatomy. For example we had no idea the trailer had 4 beds, or how to get to the water tank from the inside?! We’ll be highlighting the different and newly discovered features in the coming weeks. All sorts of little quirks you discover on your hands and knees mopping floors๐Ÿ˜‰. Speaking of which, back  to more scrubbing! Happy Sunday everyone!

Super Easy (and Cheap) Curtain Rod Hack: West Elm with Wood

For 6 months I was secretly watching these beautiful West Elm curtain rods, crossing fingers they’d drop in price… 


Um yeah no…Sorry West a Elm we just can’t drop a dime on curtain rods right now. (As pretty as they are๐Ÿ˜ž) 

Instead we had these Martha Stewart “door knob” curtain rods, as free hand me downs… 


I guess these might be pretty but they aren’t the clean and simple lines of midcentury. West Elm seems to have captured that with their curtain rods. Darn them and their addicting product lines! Oh the decorating torture! 

After putting up our oversized map in the guest room I soon realized the existing curtain rods were too traditional and “knobby”. Also the “wood” frame of the map gave inspiration and would help tie the wood and metal together in the room. 

First we had some random dowels left over from our guest house cabinet project which I cut in 4 equal sizes. (I went with a longer 3inch length since I only have a hand saw and did not want to cut off a finger.) Then sanded each piece smooth. 


I found theses handy dandy curtain rod connector screws, and drilling pilot holes, screwed them into each piece.


Once done, I unscrewed each of the existing rod ends and replaced them with the new wooden dowel ends. 


Ridiculously easy way to change your existing curtain rods style without spending a mint. Hope you all have a safe and fun holiday weekend! Happy Sunday everyone! 

Framing Huge Art for $30

It’s that time of year again…Weather is perfect…Campsites are being reserved…And the last thing we want to do is be stuck at home…California is calling us…  


 Which is why it was kismet to find an enormous map of California at the Sacramento antique fair. I’ve been wanting one for our guest room/office for the past year. There are so many places to camp, enjoy, and discover in our home state that I wanted to mark off the travel bucket list. This map will be a visual tracker of our progress and very cool art piece. 

Plus maps seem to look fabulous against (already painted) baby blue walls… 

 (An example from the amazingly talented Emily Henderson’s guest room) Well, I’ve got blue walls too why doesn’t it look the same? Ours just looks sad?!

 I quickly realized the map needed a smooth backing and frame to finish it off. Yet to custom frame a map like this would cost me hundreds of dollars…So in the budget conscious style of LHBD we faked it. 

Here’s how we did it… (This is also super temporary should you be renting or just like to change your art around constantly)

  We bought some very thin cabinet backer board cut by Home Depot to the dimensions of the map. Then duct taped the two pieces together.   Command strips were our friend, lots and lots of them, all over the back of the boards. 

 Then stuck the boards to the wall. 

We hung the map using poster (light weight) command strips flattening it against the boards. 

 We then found pvc/faux wood baseboard at Home Depot.  

  Much cheaper than wood, lightweight, and very easy to cut the angles for the frame.    Next we used the scotch indoor mounting tape for the back of the frame pieces.  (Now if you’re renting we can’t guarantee this tape won’t take a bit of paint away. However a couple finishing nails at the corners and command strips may have the same results) 

Voila! Giant framed art for $30! 

 We can’t wait to start marking off the locations we’ve been, dog friendly places we’ve stayed and campsites to swoon over. Hopefully you have fun vacations planned for the summer and memories to make! Happy Sunday everyone!

What a BIG, DIY Sunburst Mirror for $15?!ย 

I’ve been hiding a diy project for months…(Well, not really) Rather it has been like a ninja, hiding out in the background, waiting for its chance on the blog. Some may have noticed it here:  


Then here: 


And like a ninja, it’s cloaked in mystery. .. Everyone  assumes we either bought it at some high end furniture store or its an authentic antique from the 1960s…   

  (When in reality, I had only $15 to spend and needed another diy decoration for our Mad Men party.)

This big, sunburst mirror had very humble beginnings, and started out like this: 


A huge $10 thrift store mirror (bought at half price), kabob sticks, some rustoleum gold metallic spray paint and my glue gun. 

One rainy, cold day, when the pups and us were trapped indoors, I thought I’d attempt this mind numbing project. I’d seen the diy sunburst mirror made from paint sticks and wood shims but really hesitant to try with kabob sticks. Maybe because this might have something to do with it… 


And this…(an hour later)…


The actual project is really simple and easy, but I recommend watching a marathon of your favorite TV show when attempting to hot glue hundreds of kabob sticks. 

As you can see I had traced out a star pattern on the back as a guide. Once all the glue had dried, Eric helped me spray paint it. We taped the actual mirror surface with painters tape to avoid spraying it gold. (Warning: large mirrors like this with pointed wooden sticks are incredibly awkward and somewhat heavy to try moving and hang by yourself– also one of the reasons we didn’t get a chance to take pictures) 

Now we have our big, diy, faux designer Sunburst mirror to go along with our big, diy, faux midcentury buffet๐Ÿ˜‰


Honestly the mirror was intended as 1960s party decor but I think we’ll keep it up for awhile. (It’s grown on me) Plus it looks just elegant enough to be mistaken for a Z gallery or pier 1 design. (Not kabob sticks held together with hot glue) Happy Sunday everyone! 

Party Favors for Bachlorette/Bachelor, Weddings and Adult Birthday Parties—DIY “Hangover Kits” with Free Printable

Dont deny it, as kids one of the best things about parties was the party favor we got to take home at the end.

When we first decided on a Mad Men themed charity dinner, we knew we needed to pass out “thank you” favors for all the guests who donated. We had a prize raffle drawing, but needed a little “fun”  adult favor to show our appreciation.

Surfing pinterest for an upcoming Bachlorette party I discovered “hangover kits” were a  neat way to round out a long weekend. A scaled down, mini version would be perfect for our Mad Men party.  

As promised here is the little How-to for these adult party favors. As well as the free (and customizable) printables so you can recreate them for your event.

Firstly all the items were bought on Amazon and/or at our local grocery store.

The kit includes Advil, a packet of instant coffee, some life saver breath mints, and a box of matches with the label “At times like this what would Don Draper do?”

People asked me why matches? Well for one, they were just so fun to customize, and perfect for our Mad Men themed party. The second, (I will try to explain this as delicately as possible), did your old school grandpa ever tell you there is a box of matches in the bathroom?๐Ÿ˜‰( a hold over from the depression and WWII, but still an effective technique) Just say’in, and just in case…

Either way customizing match boxes is one of the easiest projects for your themed party. Just print, cut and stick. Theses labels print perfectly on the Avery address labels 5162

Here is the free matchbox printable: MAD MEN Labels Don Draper

You will need to cut them to the size of your match boxes. However I just used my cricut straight cut, peeled them from the backing and stuck them on the match boxes.


The second printable for the favor bag, you will be able to customize your name and event, but these are also printed on Avery 5162 labels.  No cutting necessary but you may need to ensure your favor bags are large enough for these labels. (I had extra bags leftover from my wedding or I’d provide more details, but they can be purchased at most craft stores)

Here is the Hangover Kit Printable (minus our initials and events info)


Then we just packed them all full of “goodies” and were passed out at the party. You can also customize the favor goodies, such as attaching them to mini water bottles, adding starbucks gift cards, including cold packs and/or cheap sunglasses etc. (Anything that might help a hungover friend the next day๐Ÿ˜‰)

 However for our little shindig these were perfect. Easy, simple, and budget friendly, we were glad to provide our friends with a little laugh and a big thank you. Hope your next adult event is amazing! Happy Sunday everyone!

Happy Monday! Jute wrapped pendant light, late blog post and some “mad” mischief…

Happy Monday everyone! Wait?! What a Monday morning post?! 

I have the day off recovering from some “Mad” mischief. For those who have been following us on Instagram you may have seen some of the pics already. For those who aren’t, here is a little hint…๏ปฟ

๏ปฟ

Oh yeah, still cleaning today…But well worth the stiff muscles and ahem headache๐Ÿ˜‰ More surprises and pics to come next Sunday…

As for this week here is the promised post about our jute wrapped hanging pendant from our guest house…๏ปฟ

๏ปฟ

As all you dear friends know I can’t sew, loathe knitting, and can barely crochet. I wish I could but my little attention span is reserved for hot glue, sawing wood, and electrical wiring. As much as I wish, I can’t spare any for the fine art of macrame or the sewing arts. But…I can tie a knot…lots of knots especially when watching a marathon of Mad Men๐Ÿ˜‰ (l still had to untie several knots and start over but I got through it)

๏ปฟ๏ปฟ

Basically the project is really simple, find a pendant light you love, a large spool of jute (usually sold at your local craft stores) and lots of patience. The knot is the pretty standard- “tie your shoe” kind as well.๏ปฟ

๏ปฟ

๏ปฟ๏ปฟ

Here is a really fabulous how to on tying the knots, courtesy of Design Sponge, but ours is adapted to only one kind of jute, (and no hot glue). ๏ปฟ

๏ปฟ Hope you all have an amazing day! We’ll see you all next weekend with fun photos! Happy Sun–err Monday everyone! 

Guest House and Concrete Counters: Finally a Before & After!ย 

Have you ever had a project you ignored, detested, put off or just wished you never started in the first place? (The one project you so desperately wanted to call the professionals for) Our neglected guest house was that project…

Aptly referred to as “The Cave”, the studio apartment above our garage just creeped me out. Someone even lived and cooked up there at some point during the previous ownership. How do I know this?…Grease, food stains, mold, dirt, etc.

(Also I was the one doing the massive clean up, painting, decorating, exorcising spiders and the ghosts of owners past.)

First step (in the very drawn out) guest house project was basic clean up and painting party. This was back in the summer of 2012, right after move in. My good friends Amber, Maggie and I all got “high” on oil based primer one evening as we tried to cover the nasty paneling. 

Those ladies were troopers! It was awful! Even with ventilation and masks we all got horrible paint headaches. It took two coats of primer and three coats of basic latex paint to prevent the orange stain from bleeding through. (Even three years later, I think I still owe them a couple more dinners to make it up to them๐Ÿ˜‰) 

Then post wedding, and main house craziness; new roof, water heaters, plumbing, etc. The guest house became just a neglected storage space. Yet in the last three years we kept moving forward, (albeit very, very slowly) towards making it livable. 

Since our main house is only two bedrooms, we desperately wanted a cheery, space our family and friends would love to stay in (and not go running for the nearby Holiday Inn)

We also L-O-V-E the sea and dream of owning a coastal retreat someday. We’ve collected, and were given so much “beach house” decor that decorating the guest house in the style seemed perfect. 

Only in the last month, the need for a guest house (and extra bathroom) has become a necessity. Therefore we put our efforts into overdrive; replacing the water heater, installing light fixtures, adding concrete countertops, deep, deep cleaning, decorating, etc. (even adding those aforementioned accent pillows๐Ÿ˜‰) 

Now here are those much awaited “Before & After” pics!…

๏ปฟ๏ปฟEdit

Edit  


Here are some more fun “after” pics…(our glass bottle lamp now has a home!)

(My attempt at a panoramic pic of the guest house)


We also added these floating wine box shelves…

We’ll be sure to include a little “how to” on our jute wrapped pendant light in the coming weeks.

We do have a few more projects in store for this guest house; new hardwood floors, a new ac, new stairs and deck, etc. However our little budget does not match our big wish list so those projects will be on hold. (Hopefully not another three years though๐Ÿ˜‰)

Also I need to convert the bed back to a pull-out King, but that will require an extra mattress and more Ikea slats. For now, a twin bed will do the job when younger brothers occasionally crash at our place. Yet I can’t wait to have it completely ready as a private retreat for our friends and family. (More on creating “Hotel LHBD” for another post)

We’re just so glad to finally have a clean, cheerful guest house and no longer “The Cave”. Happy Sunday everyone!

Finishing the Unfinished…(IKEA Hack Pax Side Murphy Dog Bed)

On our blog we don’t try to hide the mess, the mayham or the unfinished…๏ปฟ

๏ปฟ

(We just pretend it was meant to look that way) ๐Ÿ˜‰

Last year we hacked a clearance Ikea Pax wardrobe to create a simple Side Murphy bed. ๏ปฟSuper easy and fun project! (Even though we use this for our dogs, the bed could work for us two legged folks as well) 

๏ปฟ

You can click here to read the original How-to, however we’ve made some minor changes recently (like actually finish this project) …

๏ปฟ๏ปฟ

What an improvement! Subtle, but changes the look completely. (It’s like  having braces on your teeth to now a perfectly white, straight smile)

  To be honest, it was out of necessity that we changed it from an awkward, not-quite-bar, into a faux Midcentury sideboard/buffet. The necessity turned out to be Super Bowl 2015, and we needed a very tall snack station. Mainly to prevent super-sized puppies from sticking their noses in bean dip when no one was looking. (Sutter is the height of a small Great Dane so standard tables are no obstacle for him) Heres what we did:

๏ปฟ๏ปฟ

Moving the wood front piece was pretty simple, we just unscrewed the piano hinge connected to the Pax. Placed the board at the edge of the bottom piece (towards the front) and screwed it back in place.

๏ปฟ๏ปฟ

The second change required more thought but still pretty easy. First we went shopping for matching board and had it cut to size at Home Depot. 

๏ปฟ๏ปฟ

Then if you have ever hacked IKEA furniture I’m sure you have extra dowels hanging around the house (if not they are normally available to buy at Home Depot). 

๏ปฟ๏ปฟ

We drilled holes in the board the size of the dowels and then lined up the board at the end of the pax. 

๏ปฟ๏ปฟ

Once satisfied with the placement we glued the pieces in place with gorilla wood glue. The weight of the boards kept the side piece in place but we had to get “creative” when gluing the small front piece…๏ปฟ

๏ปฟ

The one safety tip we highly recommend is to add a “safety chain” to the inside of the pax wardrobe and drill it to the front piece. In case the latch slips or you have little ones you don’t want the front piece to fall on a toe, etc. ๏ปฟ(Unfortunately we can’t recommend a specific kind because it’s based on the weight and how you customize the front piece of you Murphy bed) These types of door safety chain kits should be available at your local hardware store. 

๏ปฟ

Overall the  dogs are happy, and we’re happy with the final outcome to this project. ๏ปฟ

๏ปฟ

๏ปฟ

For someone with limited space, it is absolutely fantastic to hide away a bed. As a pet parent, it’s even better to hide dog beds, toys, etc for two massive pups! Hope our Ikea hack helps your doggy dilemma! Happy Sunday everyone! ๏ปฟ

Ikea-hack-side-murphy-bed-dog-murphy-bed-pax-wardrobe-twin-murphy-bed-diy-midcentury-sideboard-bar.jpg

Psst…We’re hanging out at the Remodelaholic link party this month…Check out all the budget friendly ideas!

 <a href=”http://www.remodelaholic.com&#8221; target=”_blank” rel=”nofollow”><img class=”nopin pib-hover-img” border=”0″ alt=”I party with Remodelaholic” src=”http://www.remodelaholic.com/wp-content/uploads/2014/04/remodelaholic_party.jpg”/></a&gt;

Dealing with DIY Burn-Out…And Learning to be Kind to Ourselves

IMG_4163-0.JPG

We didn’t disappear in some dramatic fashion! Nor did we even have a good excuse…Instead “DIY and blogging burn-out” insidiously crept up on us without warning. One day gun-ho and ready to take on the next big project…Then days, weeks, months dragged out, and we did not lift a finger.

Looking back on 2014, I was able to identify four key reasons why we lost our diy mojo:
1. Energy
2. Finances
3. Long term plan
4. Purpose

Interestingly aren’t these the four reasons experts attribute to why businesses, goals and even relationships fail?

Not surprisingly we were impacted by all four reasons, and thus the blog suffered from our severe burn-out.

Originally as I wrote this post I was very unkind to myself. (Beating myself up both with words and pictures of our unfinished projects.)

Yet as the words of self-deprecating humor and undisguised sarcasm flowed forth, there was a moment of clarity…

Robert Collier’s famous quote came to mind…

“Success is the sum of small efforts repeated day in and day out”

Instead of taking the approach of “slow and steady wins the race”, we took off like jack rabbits only to finish half-way. We lost steam, didn’t want to spend the money, and even considered selling the house.

In the midst of self doubt, burn-out and feeling like a failure, I had forgotten the purpose of this blog in the first place:

A little corner of the Internet meant for weekly diy mistakes, inspiration, silliness, humor and “four legged” kids.

The blog was supposed to be the sum of our small, diy, efforts with the hope of inspiring others…For two years hadn’t we accomplished this?

After several sleepless nights of Internet research. We’ve discovered a greater “purpose” and plan for the blog.

The benefit of a plan will prevent lapses in Sunday posts and DIY burn-out. As time passes and I grow into a stronger and braver writer, I hope to have the courage to share with our loyal readers and friends, what our purpose is, and how we found our way back.

In the coming Sunday’s you’ll see a major change in both writing style and DIY. We’ll be tackling projects in bite size pieces, be kinder and forgiving to ourselves, and laugh more at our mistakes. We are grateful to those of you who stuck by us these past months, and we love you for it!

Happy Sunday everyone!

When house projects fail…Build a $5 bike crate!

This post was never supposed to happen…Instead the plan was to reveal our DIY concrete planters. (Sort of like these)

20140907-210030-75630687.jpg
What I thought would be a brilliant idea for cheap and light weight planter boxes, turned into a cracked mess of gravel and concrete. (Which of course I spent the afternoon cleaning up)

Shortly after, I was scratching my head and wondering what am I going to do with 12 sets of wooden handles, and 6 plastic garbage cans?

How about use the wooden handles for a wine crate? What if the wine crate was attached to a bike?

20140907-210458-75898148.jpg
See the hubs has a vintage bike, used mainly for cruising around town with the guys. Yet his bike has been sorely lacking in storage and beer hauling capabilities.

20140907-210805-76085596.jpg
Alas when searching the web for instructions, there weren’t any for “easily” removable bike wine crates. So here is our how-to for the $5 bike wine crate:

You’ll need…
2 wooden 1×1 inch dowels (cut to the width of your bike rack)
2.5 inch screws and accompanying nuts (4 total)
Some wood stain
A wooden wine crate
1 inch screws and accompanying nuts (2 total)
An empty paint quart (or empty vegetable can with no sharp edges may work)

20140907-212034-76834985.jpg

First I stained the wine crate and dowels (since I had already drilled the holes in the dowels)

20140907-212244-76964251.jpg

20140907-212307-76987919.jpg
After we let the stain dry overnight, we added the 2.5 inch screws to the dowels. We also darkened the tips of the screws with a sharpie so we could mark the wine crate for drilling holes.

20140907-212621-77181169.jpg

20140907-212642-77202496.jpg

We then drilled holes in the bottom of each crate.

20140907-212730-77250134.jpg
And secured the crate with a wrench and nuts.

20140907-212856-77336949.jpg

20140907-212918-77358779.jpg
(You can see how the crate is secured to the dowels from the bottom)

20140907-213016-77416254.jpg
Finally we drilled holes through the paint can and bottom of box.

20140907-213108-77468200.jpg
Then secured the can with the 1 inch screws and nuts.

20140907-213202-77522356.jpg

The bike is now ready for picnics, commuting with coffee and “booze” cruisin with the guys.

20140907-213647-77807091.jpg

20140907-213723-77843873.jpg
Not bad for $5 and 15 minutes to install right? Happy Sunday everyone!