How-to Extend a Shelf (and Why it Took us 6 Months!)

Why does a simple project, that should’ve taken a weekend, instead lasts for 6 months? You know that project, the one requiring multiple trips to Home Depot and phone calls to your dad for advice. All us DIYers have experienced the so-called “easy” project.
Our drama started when I decided let’s keep and restore our midcentury built in…

IMG_4455.JPG
According to our home’s blueprints these built-ins housed original audio equipment and mini organ in unfortunately what is now the countertop. The previous owners family had replaced the flip top cabinetry with a laminate countertop that poorly matched the original wood stain. Of course this was probably a practical decision because it increased countertop and work space. However we lost out on a valuable vintage detail that made these cabinets so unique. Like these…(via Pinterest)

IMG_4458.PNG

IMG_4457.PNG

IMG_4456.PNG
Therefore our next step was to extend the shelves. That wouldn’t be hard right? Wrong!
I literally schlepped to Home Depot 4 times on one Saturday with drawer in hand, trying to match wood stain. It is nearly impossible to achieve that perfectly aged amber color, familiar with midcentury cabinetry.

Finally I gave up and moped about it for a few months. (Admittedly this project was one of the reasons we were defeated by diy, and had such severe bloggers burn-out)

Luckily I got a second wind in 2015 and this project was back on track again. Except where do I find midcentury shelves? Especially ones with odd dimensions?

I hunted in antique fairs, thrift stores, and Craigslist. Every time coming up empty handed. Until I gave up again, and started looking for blue print cabinets. (Another project for another Sunday) I stumbled onto the perfect shelves at Rulands used office furniture in Sacramento!

The only downside was that the edges of the shelves were unfinished particle board. Therefore we had Home Depot mix up a sample of color matched paint and with a mini foam roller got to work.

IMG_4272.JPG

IMG_4273.JPG
To prevent paint from running over the edges, I took a damp paper towel and wiped away the excess with each application.

IMG_4274.JPG

IMG_4275.JPG
Finally once the boards were dried we countersunk screws into the built in shelves (both from the bottom and top)

IMG_4315.JPG

IMG_4317.JPG

IMG_4316.JPG
Ultimately we did not glue the extension shelves to the builtin because should our tastes change we’d want the flexibility of just removing the screws if we need to. However with 6-8 two inch screws these shelves are not budging!

IMG_4319.JPG

IMG_4321.JPG
On to lighting next week! Happy “Super Bowl” Sunday everyone!

Midcentury Built-in…To Demo or Not Demo…That was the Question

“Oh no these gotta go.” I said looking at the wall of orange cabinetry.

IMG_4323.JPG
This was two years ago standing in our eat in kitchen. I had dreams of punching through this same wall and creating an open concept floor plan. Then one year passed…Two years and the built-in is still there.

IMG_4339.JPG
The burgundy brick of our eat in kitchen has been painted to a muted gray. The mustard yellow walls are gone, but the orangey built-in still remains. As we slowly started to neutralize the kitchen colors the midcentury aged patina of the paneled wood started to grow on me. (If you follow us on Pinterest you’ll notice my weakness for 1950s architecture and design.) Yet apparently I’m not the only one sipping the kool aid: Sunset magazine, Dwell, Domaine, and even House Beautiful seem to love mid century style and this shade of amber wood:

IMG_4345.PNG

IMG_4348.PNG

IMG_4350.PNG

IMG_4343.PNG

IMG_4349.PNG
Is midcentury design everyone’s style? No! Vintage farmhouse and industrial elements are still all over pinterest and the blogosphere. Yet with Nate Berkus working his magic at Target, and other big name companies copying Classic midcentury textures, colors and designs, I think we’ll be seeing a resurgence soon enough. If not at least everyone should have a faux Eames chair! (That design will never die, they’re just so comfy!)

IMG_4353.JPG
Yet it wasn’t until we unearthed the original blue prints of our house that I realized there was something special about these cabinets…

IMG_4340.JPG
Holy smokes! This built-in was meant to house a 1948 sound system. (We still have the original speakers in our attic today!) Yet the wiring has long ago been cut and vintage electronics gone.

I started to rethink my initial plan of a complete tear down. I researched that Midcentury design and original features can add value to an older home. Also admittedly I’m a huge nerd when it comes to retro audio systems and classic records. (just check out our “Vintage Sound” board on Pinterest and you’ll see my geeky adoration for tube receivers, and all things vinyl)

IMG_4355.JPG
A bonus to restoring the built-ins versus demoing, I will have a place to display my small collection of vintage audio, rather than take up space in our guest room.

Therefore we’ve decided to forgo demo in favor of restoration. We need to keep a few elements of our early midcentury home original. It may not be all the rage in interior design right now but sometimes design is about what’s in your heart and what makes you happy.

Therefore over the next couple Sundays we’ll be focused on this little orange corner becoming the heart of the home. To lighten it, style it and above all give it back some purpose. This will be my little sanctuary after a long days work. Where I can kick off my heels, cook dinner and dance with a glass of wine to Sinatra. Do you have an ugly duckling in your home waiting to become a swan?

IMG_4338.JPG
Happy Sunday everyone!

So What is the Plan for 2015?…

Do you remember the office/guest room’s before pics…

IMG_0332.JPG
Now here is the “After”…

IMG_4256.JPG
Say what?!
No I did not accidentally flip flop the pictures. We really are starting out 2015 with a clean slate. We’re finally “cleaning house” of our college dorm and single days decor. The broken Big Lots and outdated Ikea furniture are going bye bye!

Don’t get us wrong, we are loyal to the big yellow and blue Swedish design, as well as killer prices. However after 11 years, it’s time to swap out some key furniture pieces and reconfigure wall decor. Rather than focus on filling a space based on what we’ve just had around or hand me downs, we are going to be on the hunt for quality, personalized and keepsake furniture.

We also need to do some major organization overhaul. (I think I counted 12 bankers boxes of files in our office closet that are waiting to be scanned then shredded)

Meanwhile the dogs are back to mischief and tearing up their sheets and bed when we’re at work. (Apparently they were feeling our burn-out and long work hours too) Thus we need to keep them in mind when choosing new decor, as well as balancing business, work and the all important dog walks.

Therefore the whole family is focused on balance, following the plan and “dog proofing” the house in 2015.

The diy plan is very simple:
1. Redesign our guest/office
2. Finish the unfinished projects (the kitchen, eat in dining room, living room, backyard and master bedroom)
3. Get a start on the guest house/apartment (right now it’s just glorified storage space)

We do have a few surprises up our sleeves, this year. (But scared to jinx them by posting too soon)
Maybe along the way we’ll manage some honest to goodness “after” pics, but we’re not going to rush into design choices. Nor do we want to suffer from diy burn-out again. In the meantime follow us on Pinterest for some style sneak peeks and our design inspiration. Like these dual office and guest rooms…

IMG_4260.PNG

IMG_4258.PNG

IMG_4259.PNG

IMG_4261.PNG

We are excited for 2015, finding balance, some big changes and even clean slates. Happy Sunday everyone!

Dealing with DIY Burn-Out…And Learning to be Kind to Ourselves

IMG_4163-0.JPG

We didn’t disappear in some dramatic fashion! Nor did we even have a good excuse…Instead “DIY and blogging burn-out” insidiously crept up on us without warning. One day gun-ho and ready to take on the next big project…Then days, weeks, months dragged out, and we did not lift a finger.

Looking back on 2014, I was able to identify four key reasons why we lost our diy mojo:
1. Energy
2. Finances
3. Long term plan
4. Purpose

Interestingly aren’t these the four reasons experts attribute to why businesses, goals and even relationships fail?

Not surprisingly we were impacted by all four reasons, and thus the blog suffered from our severe burn-out.

Originally as I wrote this post I was very unkind to myself. (Beating myself up both with words and pictures of our unfinished projects.)

Yet as the words of self-deprecating humor and undisguised sarcasm flowed forth, there was a moment of clarity…

Robert Collier’s famous quote came to mind…

“Success is the sum of small efforts repeated day in and day out”

Instead of taking the approach of “slow and steady wins the race”, we took off like jack rabbits only to finish half-way. We lost steam, didn’t want to spend the money, and even considered selling the house.

In the midst of self doubt, burn-out and feeling like a failure, I had forgotten the purpose of this blog in the first place:

A little corner of the Internet meant for weekly diy mistakes, inspiration, silliness, humor and “four legged” kids.

The blog was supposed to be the sum of our small, diy, efforts with the hope of inspiring others…For two years hadn’t we accomplished this?

After several sleepless nights of Internet research. We’ve discovered a greater “purpose” and plan for the blog.

The benefit of a plan will prevent lapses in Sunday posts and DIY burn-out. As time passes and I grow into a stronger and braver writer, I hope to have the courage to share with our loyal readers and friends, what our purpose is, and how we found our way back.

In the coming Sunday’s you’ll see a major change in both writing style and DIY. We’ll be tackling projects in bite size pieces, be kinder and forgiving to ourselves, and laugh more at our mistakes. We are grateful to those of you who stuck by us these past months, and we love you for it!

Happy Sunday everyone!

Our Busy People Series…The Busy Investor…And where are the dogs?

We are busy, busy people…We work very long hours and are dedicated to our careers. We run a blog, starting a part-time business, renovating an old home, and are parents to two high maintenance pooches. (Who are probably more toddler-like than the average toddler). Which is why I am constantly trying to find new ways to be better organized, efficient, and manage my time wisely. Hence the Busy People Series was born!

We kicked it off with the Busy Budgeter, and now we’re on to the Busy Investor.

Free Investment Printables Cover

Ugh! Investments! Yuck! Retirement! Those are words dreaded by many. Including my husband. His eyes will glaze over with boredom, and even try to sidle his way out of the room. While I’m definitely the number crunching, science, and business nerd in the relationship. I love it! In fact I’ve been part of a women’s investment group/book club for the last three years. (SHOUT OUT TO THE FAB LADIES OF LEAP!)

What I’ve learned from the group is that investments and retirement planning can be intimidating for many women. (Some of us came to the group knowing absolutely nothing about finance.) Yet you don’t have to be a day trader, financial whiz or number crunching nerd to be successful in investing. Which is why we wanted to share our system that is both time saving, organized, and easy to follow. All you need is a little time set aside every month or every 3 months to sit down and review your accounts. Here we go…

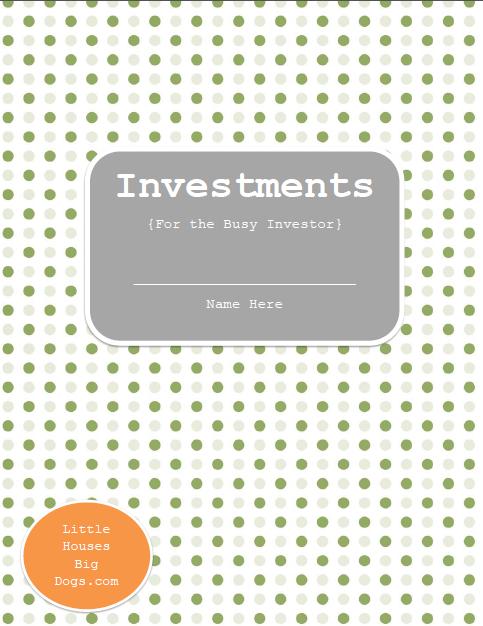
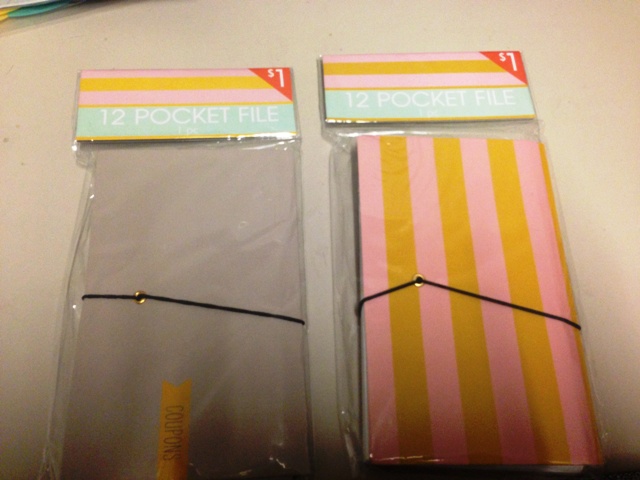
First free printable is easy…A cute cover…Unlike the last Busy Budgeter printables, these are meant to fit in a standard 3 ring binder. (Because who wants to trek around ALL their important retirement and investment info?)

Free Investment Printables Cover  Free_investment_printable_cover

Second are the money goals…Creating a short-term, mid-term, and long-term plan for your money is crucial to making your money work for you. We need money goals to help stay the course for where we want to be financially in the next 1, 5 or 20+ years. For example maybe a money goal for you is to buy a house in the next five years and you need to save for a down payment. Write it down in the time period that suites your finances best. Also have fun and go wild with your goals! You might end up hitting one or all if you stay the course. Even the free spirited, creative dreamers love this part!

Free Investment Printables Money GoalsFree_investment_printable_money_goals

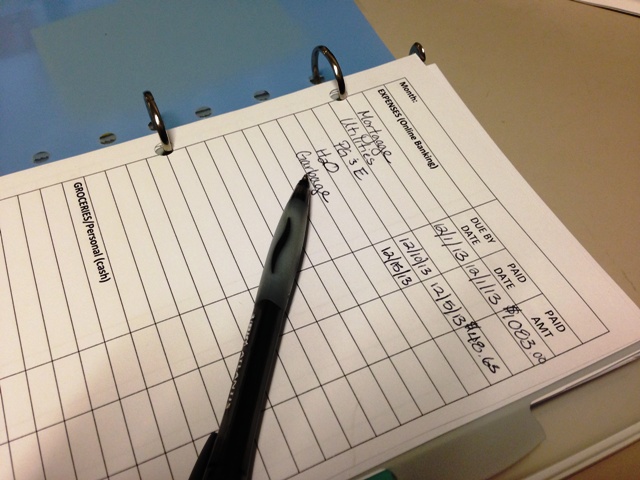
Third are your asset and liabilities trackers…Use the printables to keep a running tally of what you have and what you owe. If you are using the Busy Budgeter trackers then you may already have this information readily available. Yay for saving time!

Free Investment Printables Asset TrackerFree Investment Printables Liabilities Tracker

Free_investment_printable_assets                     Free_investment_printable_liabilities

The monthly graphs allow you to track your progress on each. (Write your totals from the trackers on the vertical line for each corresponding month) Also don’t forget to write down notes of encouragement as you go.

Free Investment Printables Asset GraphFree Investment Printables Liabilities Graph

Free_investment_printable_assets_graph Free_investment_printable_liabilities_graph

Your goal is to see your Assets graph go up, and your Liabilities graph go down. I’ve found the graphs to be incredibly helpful in providing a visual of our progress. If you’re a visual person who hates number crunching these graphs are fabulous for staying motivated.

Now the next is MY favorite part…Its your Investment/Retirement “Buckets”…This is the easiest way to understand the concept of “Asset Allocation”. (And the part where my hubby’s eyes glaze over) In fact not even the financial gurus can fully explain how the concept works…But here is how it works for us. Essentially who wants to place all their nest “eggs” in one basket right? We have found it easier to think of our investment accounts as different baskets, or rather “Buckets”. For example we have a “bucket”/account that is conservative, one for aggressive growth, one for short term savings, one for balance, etc. (Here’s a visual example)

Investment Buckets example

You want your investments to “zig when others are zagging” or visa versa. When the market is good our conservative “bucket” will lag, and my balanced or growth “bucket” normally does great. Each bucket either resides in a specific type of account best suited for the tax advantages, borrowing options, liquidity…(Wait I know I lost some of you now)…Instead here is a great resource to learn more about types of accounts, advantages/disadvantages and terms at Investopedia.com (ie. IRA, Roth IRA, 401K, 403Bs, online brokerage, etc) Also when you access your investment accounts, there is a tab or field called the “year to date”, and normally there will be a return % available. You use this number to see how well you did in your investment account (the ROI or return on your investment).

Free Investment Printables Investment BucketsFree_investment_printable_investments

If you want to skip this printable be my guest. Basically this is just great practice for investing and understanding retirement. You don’t need to focus on the day to day gains or losses, but rather calculating, and being knowledgeable is half the battle. The Labor Department surveyed that only 42% of Americans have actually tried to calculate how much they will need for retirement. While USAToday stated 74% of the baby boomers are falling short, which doesn’t bode well for us youngsters. At least staying organized, tracking and creating money goals will start us on the right foot.

Lastly is the Statements and Correspondence cover…A great place to separate and store your account statements and letters from your investments. Basically the binder is designed to be your one-stop, central place for all things investing.

Free Investment Printables Statements and Correspondence CoverFree_investment_printable_statements

Have we lost you? Hopefully not. Instead we hope this post will help you as an early kick off to your New Years resolutions and a good tool for organizing that file cabinet. We promise in the coming Sundays we’ll be back to dogs, home and holiday cheer. Till then, Happy Sunday everyone!

Black Friday Buzz Kill… (and Free Budget Printables)

After talking to several friends and family, it seems we’re not the only ones feeling a bit of pain in the pocketbook. Holiday season 2013, is going to be a bit lean for us and others. Which is why I thought it would be the perfect time to be the “Debbie Downer” of the Black Friday buzz. Why? Because of our recent vacation views like these… (Which really keep us centered and remind us of the importance of celebrating the holidays with family and friends, is more important than the stuff.) free budget printables 008 free budget printables 007

Also having our second water heater blow up, and new car brakes will keep a person very budget conscious. Budgets are something I love! Friends sometimes tease us about our OCD tendencies and the mysterious “budget” we refer to. Yet  budgets work, and we thought it might be useful to others out there experiencing a lean Holiday season. Also a great way to kick off our Busy People series, starting with the Busy Budgeter…So here it is…

free mini budget printables asset and liabilities tracker

Free_printables_mini_monthly_budget_sheets_assets_liabilities_tracker

(I’ve taken our spreadsheets and turned them into a handy mini budget binder!) Aren’t you just as excited as we are?!jump for joy

Not to be left out, we included the Assets and Liabilities tracker (Forgive the financial lingo) as the second page to the monthly budget printable. Also here is the newest edition…A spending journal (I started paying for the personal and grocery expenses with cash and an envelope system) and we needed a place to track all the details. Luckily Sarah at the Accidental Okie has a lovely budget system (seriously she makes budgeting so stylish), and we need to give her full credit for the inspiration of my mini spending journal. free mini spending journal tracker

free mini spending tracker and journal sheets

Basically all the sheets are sized to fit a 1 inch 5×8 binder. I use the Avery pocket binder with the built in folder/pocket to store my cash envelope system, receipts and pens.

free budget printables 002free budget printables 004free budget printables 028

Also the 5×8 size allows me to easily store the binder away in the purse so I can always budget on the go.

free budget printables 030

Each sheet is separated by a divider: Monthly Budget, Assets Sheet, Liabilities Sheet, and Spending Journal. Just fold and cut the sheets in half for each one, and three hole punch for the binder.

free budget printables 009

free budget printables 017free budget printables 020free budget printables 019free budget printables 024

I even found some plastic protectors for my coupons and mini binder paper for brainstorming weekly meal plans and grocery lists. (I’m not nearly as organized with my meal planning yet because of a new diet)

free budget printables 026free budget printables 011

We hope you find our system useful and that I didn’t completely kill your Black Friday Buzz. However as sneak peek for next Sunday’s post we have a couple follow up posts for our Busy People Series…Have a safe, fun and budget friendly Thanksgiving from us and the pups!

What to expect? When you’re expecting…A new roof! (And free printable)

Finally!…One year, three months, and many sleepless rainy nights…We have a new roof!Roof installation 014

Our previous roof was 20+ year old wood shake with a second overlay of 10+ year old wood shake. (Apparently re-roofing over old shake used to be common?) Ultimately with two shake layers falling apart, moss and broken shingles, our house was beginning to look like a hobbit house. When the wind kicked up little moss pellets would rain down, which we called “roof poop.”

We bought the house knowing the roof was bad, and this was going to be an inevitable (high cost) expense. Which would ultimately prevent us from big renovation projects the first year. We also knew having a roof installed is not that simple, even when someone else is doing the job. Here is a quick run down of what we learned from our experience and our free Homeowners Guide: Pre-Roof Checklist (printable).

Pre-roof checklist for homeowners

Pre-roof checklist for homeowners

Watch the weather forecast…And be prepared. We were biting our nails a week before the install because rain was expected the weekend of our roof tear off. Luckily the rain only came the day before. However Home Depot dropped off all the plywood/ skip sheeting on that rainy day. Luckily we had plastic tarps at the ready and were able to cover the wood in time.Roof installation 002

Expect to be under house arrest during the roof tear off. Once they start tearing you will be surrounded by mountains of wood, shingles, nails, and all sorts of debris. We had to carve out a path from our back slider in order to get out of the house. Luckily the dogs got a walk and potty break before the demo.

Roof installation 005

Expect there to be surprises as the roof is coming off…Ours was the second layer of shake, two dump runs and some dry rot. Also do not panic when you see random men sitting on low eaves, with the dry rot.

Roof installation 008

Expect a mess in your attic, especially if there never was any skip sheeting or plywood underneath your roof shingles. Roof installation 011 Roof installation 010

Luckily our roofer was awesome and started cleaning much of it with a shop vac. However it is almost impossible to remove dust from loose insulation. You can always insist on a full clean-up clause in your roof contract, but the dust is unavoidable.

Expect there to be possible delays, and the job take longer than expected. (Ours was due to the rain delay) Also early morning noise…Rise and shine 6:45 am on a Sunday morning.Roof installation 012Overall having a new roof brings incredible peace of mind and hopefully an expense that we won’t have for another 30 years. 

Roof installation 014

TOP 10 Reasons…You might be a DIY (Do it Yourself) Addict…

1. On the way to your friend’s dinner party they text you to ask, “Have you checked your hair for paint?”

2. The Home Depot staff watch for your car. 

3. Your best friend deletes your Pinterest App to stage an “intervention”

4. Your house has its own Twitter account (#DIYandLovin’it!)

5. You’ve just received your third ticket for 4×8 wood posts hanging out your front passenger window.

6. Your husband buys you a circular saw as a Valentine’s day gift. 

7. You go without a TV remote for a week, because it was misplaced while staging your living room for the perfect “after” shot. 

8. You just reached the Ideabook limit of “photos allowed” on your Houzz account

9. Your husband has set the parental controls and blocked you from HGTV, and the DIY network- he just can’t take anymore inspiration!

10. Better Homes and Gardens has filed a harassment suit against you for submitting too many projects to them. 

I hope this gives all my fellow DIYers a good laugh! Happy Sunday everyone!


Prioritizing Expenses for Your New “Old” Home

When moving into an older “new” home we often focus on the exciting stuff; paint colors, furniture, and the décor. Due to this, we forget about the important things like the “bones”.

You know the “bones,” the house’s structure, what is under all the plaster and paint. We also forget in the excitement of a home purchase and move in, the maintenance cost of older homes.

My dad put it best, “if you don’t want an expensive hobby, don’t move into an older home.”

Wait a minute! Before you stop reading …This post is not to deter you from buying or crushing on an old home. Rather to help you prioritize renovation and maintenance costs.

Hopefully through this post you can learn from both our good ideas and mistakes. Remember we’re just a few regular homeowners who learned a thing or two from buying and slowly renovating an older home. Maybe it will help you plan for lovin’on your new “old” home too.

Firstly the budget…

  1. Seriously analyze and itemize the major structural costs you see coming. Your home inspection will tell you what does or does not need work.

Our example: We needed a new roof and we knew this expense would be a biggy. Therefore we budgeted enough and squirreled it away as a future expense.

  1. Are there health concerns with your new “old” house? Possible asbestos or lead paint? (They have you sign a hazard warning in California.)

Don’t think the age of your home is a catchall. In the 1970s these hazardous materials were still in use because contractors and companies were allowed to use them in order to eliminate supply. In fact HVAC friends of ours have seen asbestos wrapped duct work even in 1980s homes. (YIKES!)

But don’t freak out yet… This is where you prioritize a possible cost and budget for encapsulation or removal. Have it tested, and bring out the professionals. They will give you the advice, do their thing and sometimes even calm your nerves. Also don’t go by what one professional says. Instead have several estimates and an independent inspector and/or lab help you. Don’t go with an abatement company who “happens to test.”

This often can be done prior to purchase. If it comes back positive get estimates for abatement and this may even become part of the negotiation process in home buying. If not you know the risks and costs and can have it professionally encapsulated and/or abated before move in.

Our example: We had the professionals come in and abate the popcorn ceilings, re-plaster and air test before move in

  1. Don’t ignore the small stuff, include those costs in the budget and priority list. It helps to imagine your home as a grandma. She may be a tough ol’ bird for 60+ years old but her bones are still 60+ years old. Don’t let that small leak in the guest bath or that saggy gutter go ignored, these can become a big problem with a BIG price tag for you later. Consider doing a mini-inspection with a handyman. Also by itemizing the projects you find, you can evaluate which ones can be a DIY project or left to a professional.

Our example: A small valve issue on an old toilet, turned into a quarter inch of water and a big clean-up for us later on. (Thank goodness for a great home warranty!)

  1. That leads to the next tip, consider extending your home warranty or adding coverage. Paying a little up front may pay dividends in a good nights sleep later.

Our example: Our real-estate agent arranged at signing for some additional coverage since there was some extra money left on the table. Our coverage included out-take pipe repair and some leaks so this has helped ease worries.

  1. Consider your future renovation plans, and start estimating the costs for materials and/or labor. You may have your dream home dancing around in your head, but once you start dreams may equal big dollars. Once the bones and maintenance are itemized and planned for, add the “dream cost” onto the list. Then you will see how much you can really budget for a kitchen remodel.

Our example: Looking at the end budget…Yikes! We knew if we wanted that kitchen remodel to happen we’d only have about $1500 left for it…This is when you know creativity and DIY can be put to use.

All in all, our best lesson, and one we need to consistently remind ourselves about, was to keep a running “home repair emergency” savings. It also should be separate and not mixed in with the renovation budget and funds. This turned out to be the best tool in helping us sleep at night when those little house catastrophes happen. (i.e. like rats moving into the attic, or an air conditioner stops working.) This little savings will help with home warranty deductibles and you’ll feel less pain in the pocket book when the maintenance issues strike.

I hope these tips help you prioritize and plan for your new “old” home, because like grandma, they may have great bones, but be prepared to take care of them.

We Don’t Do “Easy”

DIYers can attest to the mantra, “we don’t do easy.” Especially a DIYer with the guts and gumption to buy an ugly, old, fixer home. Did you experience “the look” from friends and family when you were showing them your “little bundle of joy” the 60+ year old bungalow/cottage/mid century/craftsman, etc that you were now about to buy? The one with the roof so bad that looked like it was a hobbit’s home. The one with the tri- color master bath, the twenty six different kinds of wallpaper, and the ultimate, modern day, home- buying sin… the one without a dishwasher. (For shame!)

You know, “the look” where the friends and family glance at you as if you’ve grown a unicorn horn and your freckles turned to skittles. DIYers know if we chose the “easy” way, we would be stuck in a cookie cutter home, possibly in a location that required uber commuting, and neighbors living on top of you. (At least out here in California). If we did “easy” we’d call for the nearest handyman, or contractor, and be overcharged for a renovation with no heart and a cost that left us with no money.

DIYers have learned there is an intrinsic value of not doing “easy.” Primarily that value is experience and knowledge. Yes, the creative, mechanical, part of us loves to tinker, craft and play in the mud. However the real reason we DIY is for the gained experience. We also want to save a ton of money, but more importantly we want to push the experience envelope. We want that badge of honor in the form of fork-sized splinters, rough hands, and biceps that would put Madonna’s to shame.

When friends and family ask “how did you do that? You will have the experience and knowledge to explain or help them. Gained experience is so much more valuable (and fun) than “easy”. Don’t do easy! This can be related to so many aspects of our lives, not just home improvement. If struggling with a decision, or life issue, remember this well known quote, “All things worth doing are never easy.” Instead do creative, frustrating, sweat equity, and cheap, do it yourself. Gain experience, start small, take classes. Also evaluate your skill level and time against the huge list of tasks. Oftentimes if you know yourself well enough through experience gained, you can diagnose a task quickly and ask for help. Sometimes professional help is necessary when it involves safety, but at least you had the wisdom. knowledge, and experience to know when to ask.

Does “easy” not work for you either? Not just DIY, but also other aspects of our life?