DIY, Dog Proof Drip Lines…For Dummies?

Dog proof drip line soaker house for pots

I’ll admit it, I am totally clueless when it comes to installing drip lines. Emitters, bubblers, reservoirs, lines, etc. the whole idea just seems way too complicated for watering plants. There had to be a better way?

Dog proof drip line soaker house 001

There also had to be a dog proof way? Anyone who’s raised a teething puppy probably knows drip systems, are prime targets. (Instant chew toy and tug toy rolled into one.) Luckily our dogs leave heavy duty/commercial grade garden hoses alone. Therefore it made perfect sense to construct our DIY soaker hose drip system out of an old hose.

Dog proof drip line soaker house 003

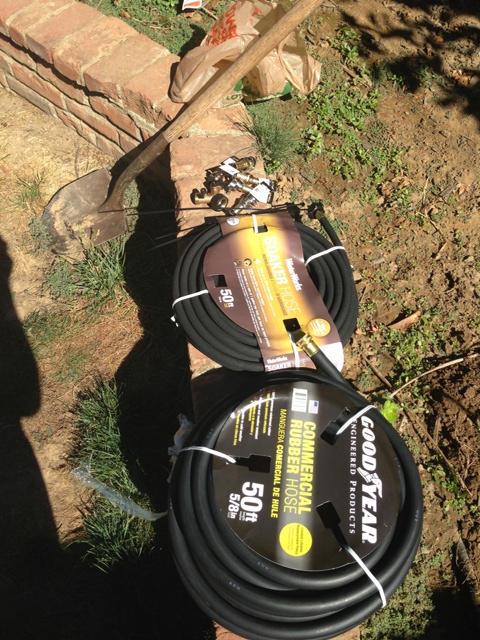
We already had an old black, heavy duty garden hose that needed replacing. However we needed a second one, for extra length since our water source was so far away. The last of the materials were 12 brass hose mender kits, and a 5/8 inch (inside diameter) 50ft black soaker hose.

Dog proof drip line soaker house 004

Then we measured and cut pieces of soaker hose for each raised planter box and pot. (Be sure to purchase the non-fabric soaker kind that doesn’t bend easily.)We were sure each piece could easily wrap around the inside of the planter box, creating a loose loop (and being generous with the lengths) Next we cut the hose, making sure there was enough length to follow the fence line. Dog proof drip line soaker house 007

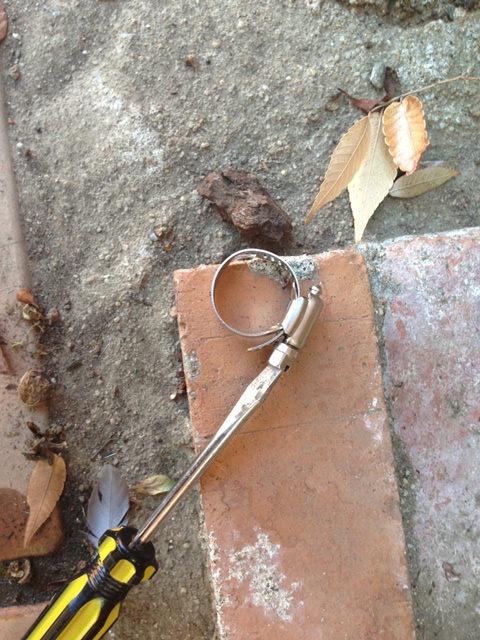
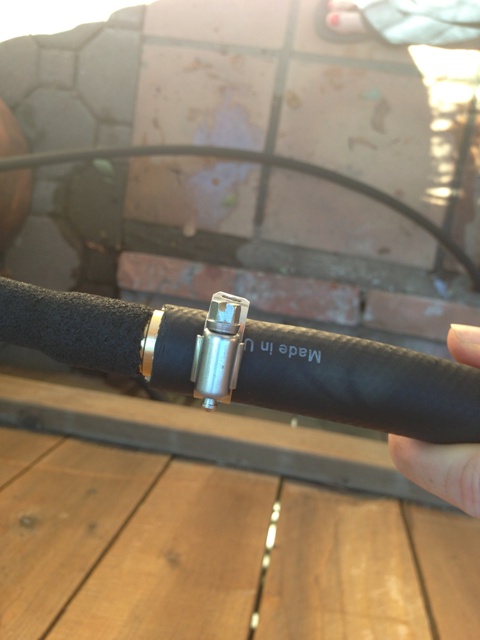
Then we inserted the hose mender brass fitting into the hose, with the other end being the soaker hose loop. Essentially for each soaker loop/pot you will need two hose mender kits if you want several pots lined up. Be sure to string the metal bands onto the hoses, and tighten them over each hose with a flat head screwdriver.

Dog proof drip line soaker house 008 Dog proof drip line soaker house 009

Dog proof drip line soaker house 010

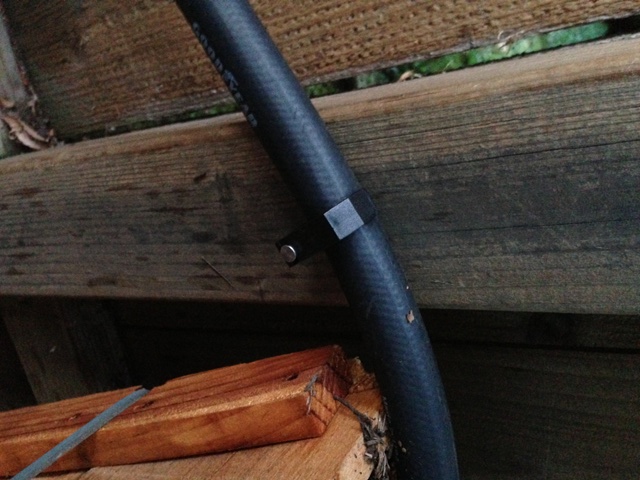
Then we secured each loop together with black zip ties and sunk them into the soil around each plant. Basically the pattern should be: garden hose, then soaker hose loop in the pot/planter, then garden hose. This pattern allowed us to spread out the pots along our side yard. At our last pot, we created a loop out of the capped end of the soaker hose. Dog proof drip line soaker house 013

Next came securing the garden hose to the fence and soaker hose loops in the pots.We sunk the soaker hose into the pots with garden staples.Then for the next step we used 3/4″shark bite plastic pipe brackets. Dog proof drip line soaker house

These brackets come with nails inside them for easy use. Just put one around the hose, place the hose and bracket on the fence and hammer it in place.

Dog proof drip line soaker house 014All in all, no special drip equipment required, very economical and if your dogs don’t chew garden hoses, pretty much dog proof.

Dog proof drip line soaker house for pots

Also if you have a completely paved area and can’t install a sprinkler system, this easy drip system is a great way to bring a large amount of water to big pots, all you need is a water spigot. A simple solution for busy people (who hate hand watering their gardens).

On the Fence…

butterfly fence art

Do you have a bare, and lonely fence? Why not give it some butterfly friends? Apparently butterflies are all the home decor rage and I’m the DIY blogger late to the butterfly party…Our project inspiration came from these beauties at Katrina’s awesome blog Design Fabulous.

I may not be an interior designer by nature, but I absolutely love landscaping and yard art.

We needed a focal point in our backyard (other than telephone poles and wires), between our privacy screens. Also this butterfly yard art has to be tough, able to stand up to the elements and Sacramento heat…Hence redwood fencing and roof flashing butterfly fence art!

Here it is again, peeking out to the side of our redwood privacy screen.

butterfly fence art 016The materials were free from our previous Fence staining and Roof flashing backsplash projects. This little guy is very economical, simple and easy to create.

First, find some butterfly clip art in Word, cut out the shapes to create a stencil, and trace them onto the roof flashing with a sharpie.

butterfly fence art 001butterfly fence art 002

Next with heavy duty tin snips, cut out the butteflies. Gardening gloves may be recommended and do be careful when cutting the roof flashing, it can be sharp. (This project is definitely for adults and specifically those who aren’t prone to accidents.)

butterfly fence art 003butterfly fence art 004

Also don’t kill your hands and spirits by trying to tackle it all in one day. Cutting out butterflies with tin snips can take some time and your hands will be sore, best strategy is to cut a few at a time each evening.

Next, using scraps of redwood fencing we lined up the boards and drilled them together with two horizontal fence pieces. (Making sure to use screws that were no longer than the wood width, to create a canvas on the opposite side without screw punctures)

butterfly fence art 005butterfly fence art 006

Then taking the metal butterflies and some tiny picture nails, we hammered them into the wood at different angles. Another neat trick was to bend the metal flashing to give the look of butterflies in flight.

butterfly fence art 007

Finally we screwed some picture hanging hardware and a plastic covered wire on the back.

butterfly fence art 008

Setting two wood screws into the strongest part of the fence and using a level to make sure the art piece would hang straight. Easy Butterfly Fence Art!

butterfly fence art 001 with graphic

What to do with extra posts?…

That was the question…I desperately wanted a vegetable garden, but there were two big obstacles standing in my way:

1) Two monstrous dogs who literally eat everything in sight (including vegetables).

2) Moving shade, due to all the trees in our neighborhood. The only place with full six hours of sun was on the tile patio.

Using extra material from our Privacy Screen project

The rolling, [dog proof] vegetable garden was born!

rolling garden cart side view

rolling garden cart baby plants 4

This cart stands about 4 ft tall, with two lattice sides for added height to keep wet noses out of the tomatoes. Here’s how we did it…

1) Using two left over 8 ft x 4 inch redwood posts, cut in half and 4 (6ftx 3/4 inch) redwood planks cut into two pieces ( a 2 ft cut and 4 ft cut). We also had 2 left over boards of 6 ft x 2 inches, (again cut into 4ft and 2 ft pieces). We connected the bottom with the sturdier (6ft x 2inch) boards and posts using tan deck screws, and essentially framed a rectangular box like the diagram below: (Extra tip: To add stability we added an extra piece of scrap wood, cut just shy of 2 ft and it helped stabilize the frame by screwing it across the middle of the box)

rolling garden card diagram 1

2) Working our way up the top we stacked and screwed the 4 ft and 2ft redwood planks to the outside of the posts.

rolling garden card diagram 2

3. To add additional height and protection from hungry dogs we cut and added redwood lattice to two sides of the cart. Then we screwed heavy duty wheels with breaking mechanisms to the bottom of the 4 inch posts. As well as brace two 2inch x 4ft boards running parallel along the inside of the framed box. (see pictures below for a better visual) This would allow for heavy duty metal wire racks to lay on them. The pots of plants sat on top of these racks, since we needed to allow for proper drainage when watering the vegetables.

rolling garden cart inside

rolling garden cart baby plants 2

4. Add a few solar post lights for decoration, and using Geopots, we now have a rolling [dog proof] vegetable garden. Here are the tomatoes starting to spring up…

rolling garden cart baby plants 3

And here again are the tomatoes that actually survived the Sacramento heat spell we just endured a couple weeks back…

rolling garden cart baby plants 4

We hope to make a few more carts in the future. Only instead plant them with different, lusher, and decorative plants for under our future pergola. These also work great for blocking off the outdoor dining space from our two big chow hounds.