Last Homemade Holiday Present Arrived!…Montana Thread Art

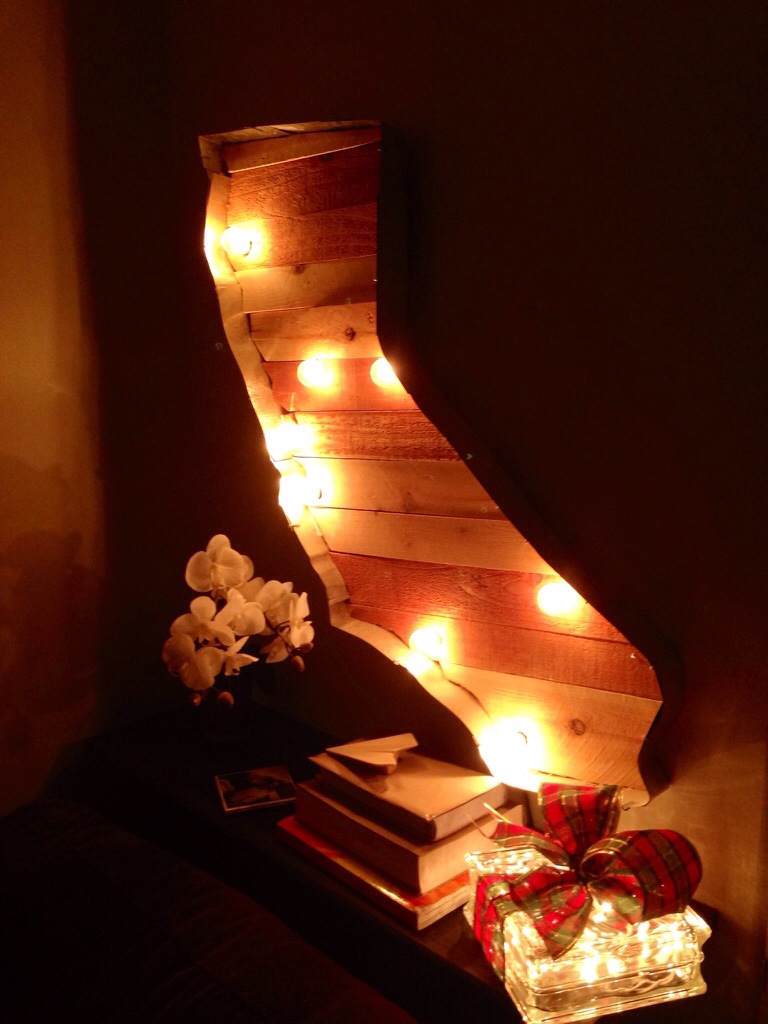
Need a thoughtful, homemade gift or art piece? We miss my little sister, brother-in-law and new nephew terribly, who now live in Texas. But to be honest,  they probably are homesick for their home state of Montana. They met in Missoula Montana for college and law school and we wanted to craft a little art piece that will make them smile. We would’ve liked to send them a Montana version of our California Marquee, but it would be way too hard to ship. Instead here is an easy, diy, Montana State Thread Art piece…diy easy montana wood nail thread art

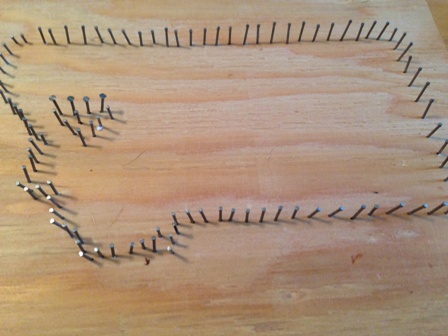
Notice the heart is where Missoula is located? It looks difficult and time consuming but it surprisingly wasn’t. Instead it only took a little patience and a few evenings of college football games (It was a two-fer…I threaded Montana and at the same time earned some major “wife points” watching those games with the hubby) I consider this craft my version of embroidery or knitting (since I can’t do either one)…And it looks industrial, made of wood, nails, and made from stuff around the house, which our readers know this is more my style! Here is the how to for another state inspired art piece…

Materials/Tools

Hammer (Possibly needle nose pliers as well)

A printed stencil of the state you want to create on paper (we found ours on the internet for free and just printed it out)

A piece of thin wood (we had some scrap pieces that were perfectly sized to a shadow box frame)

A shadow box frame (The one we found was from Michaels, and even better with a 50% off holiday coupon)

Picture matting/border (This may not be necessary, but since I was using scrap wood in an odd size we needed it.  I used some blue matting from another picture we had at the house.)

Small picture framing nails

Thread (We used navy blue thread for military uniforms, we had some lying around the house but that’s another story)

First place your state stencil on the piece of wood and hammer the nails along the lines.

diy montana wood nail thread art 001diy montana wood nail thread art 002

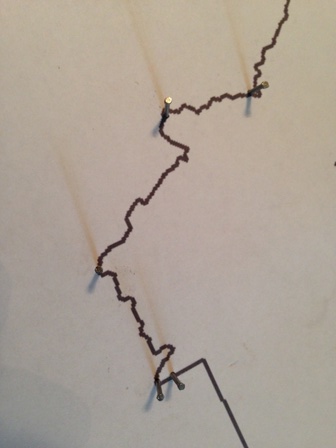
To get the nails closely spaced I used a pair of needle nose pliers to stabilize the nails. (And prevent hammering your fingers) Don’t forget to add a little nail heart inside the state in order to string the thread to a central location (Although you don’t have to use a heart) Then once all the nails are in place, gently tear the paper stencil away from the wood. The result looks a little uneven and unfinished at first but once you start to add the thread it comes together.

diy montana wood nail thread art 003diy montana wood nail thread art 004

Threading is very simple, just make a little loop in the thread, and start in the middle working outward. Pull it taught, loop it twice around one outside nail, then back to the middle again. In order to not go crazy I would sometimes give myself a break and tie the thread off in the middle before moving onto the next nail in the heart. Here is a video link and detailed How to for string art: http://www.wikihow.com/Do-String-Art

Finally when done, (And glad you did not throw the project out the window) place it in the shadow box with matting. Now its ready for your wall at home or mail it off to three awesome people in your life (who may be far in distance but never far from your heart). That’s the holiday present round up everyone! Happy Sunday!

diy easy montana wood nail thread art

Homemade Holiday Present…For the “Beer Lover” in your Life

Do you have a beer loving, brother, cousin, or friend? And does this person have a bachelor pad or even a significant other who doesn’t mind beer bottle cap decor in their house? (I think my little sister and bro in law might fall under this category…sorry guys, but I promise you’ll LOVE the other gift I made you)

Then you’re in luck! Here is another inexpensive, homemade holiday gift sure to wow that beer lover in your life…

diy gift beer bottle cap refrigerator magnets

Unfortunately this present never made it to the lil bro in time for Christmas (due to glue drying issues…more on that) however he was pretty stoked about the last minute replacement gift of a porcelain red solo cup. (Classy right?) My younger brother lives in a total bachelor pad, is a beer lover and our family mountain man. I’m sure you have one of these kinds of guys in your life and here is an easy and inexpensive gift to make for them:

Materials/Tools:

Beer bottle caps (these were “painstakingly” provided by my husband and friends, thanks for taking one for the team boys!)

Glue (We found gorilla glue worked the best in the end, don’t base it on our pictures and go with Tacky glue)

Peel and stick magnets

Cork mat remnants (I found mine at Target two years ago, for another craft and used the leftovers, but I’m pretty sure Target still sells them)

Scissors

First round up your bottle caps, then trace them onto the cork mat. diy gift beer bottle cap magnets 002

Next cut out the cork circles with scissors, add glue generously to the inside of the bottle cap and press the cork circle onto the glue. (Don’t worry about the cork not fitting just right, the cork crumbles and rips away easily enough so we were able to fit it to the cap)

diy gift beer bottle cap magnets 001

The following step, while the glue dried, we traced the bottle cap circles onto to peel and stick magnets, then cut them with scissors. diy gift beer bottle cap magnets 003

Finally we unpeeled the magnets paper backing, added additional glue to the cork, and placed the magnet on cork. (Sorry again, a note on the glue, don’t use Tacky glue, go with something stronger.)

diy gift beer bottle cap magnets 004

Another inexpensive, easy, holiday gift idea for the beer lover in your life, and to follow after our DIY seashell gifts from this year… One more for next week…Happy Sunday everyone!

diy gift beer bottle cap refrigerator magnets

What Christmas is Over?!

Are you feeling the same way…Christmas snuck up on you and then you really never got a chance to enjoy it properly? Are you having Christmas music withdrawal? Well then you’ve come to the right blog…(Don’t worry you can keep your Christmas decor up till Super Bowl, we don’t judge) We’re going to showcase a few of the homemade presents we gave this year over the next few Sundays because now it’s finally safe to spoil the surprise! (Nearly all the presents have arrived to their final destination, minus two. Thanks UPS, grrrr!) The featured gift today was for my mother in law and sister in law to remember our family holiday vacation this year.

20131229-070740.jpg

All in all these were really easy and simple to make…
Materials:
Some twine
A couple small abalone shells(please buy in store, don’t go pick off these little ones in nature it’s illegal in California) ours were from an antique store in Monterey
A little sprig of wired pine garland from the dollar store (preferably with little berries or mini pine cones for an added touch)
Small piece of cork board or crafters wood
Hot glue gun and a glue stick for it

First cut and loop some twine through one of abalone holes.

20131229-070824.jpg
Next write your message on the cork or wood that is cut to the appropriate dimensions for your shell. Then bend the piece of wire pine garland, do a quick dry run to see if the garland and cork/wood will fit the shell. Finally glue to the bottom edge of the shell the garland, then the cork/wood above it.

20131229-071310.jpg
Super easy, quick and sea inspired Christmas ornament! See you next Sunday!

20131229-071444.jpg

Don’t forget the adults! (Last minute Christmas gift ideas)

This Christmas has definitely felt the most hectic and craziest compared to other years. (And we don’t even have kids yet) Poor blog has felt a little of my Christmas burn out. Which is why sharing this last minute Christmas gift idea seemed appropriate…Santas “Survival kits”…

20131223-052419.jpg
Because remember Santa is an adult too, but just in case there is the non-alcoholic version for the chocolate lover in your life…

20131223-052633.jpg
Basically I started making homemade Mexican spiced hot chocolate powder this past month and created little pre-made packages to give to co-workers, friends, and family who need a little pick me up…These packages of chocolate goodness are easy to make and less expensive then cookies, breads, etc.
First find a washed little jar (baby food or pimentos). Then glue a piece of fabric to the top.

20131223-053408.jpg

20131223-053423.jpg
Next mix your ingredients for the Mexican spiced hot chocolate:
1/4 cup chocolate powder
1/4 cup sugar
1 tsp of cinnamon
1/2 tsp of chili powder
Pinch of ground nutmeg
Pinch of ground cloves
Pour in your jar, put on the lid, then top it off with a piece of pine garland and twine. You can add your favorite mini bottle of almond liqueur, kahlua or even just a big chocolate covered pretzel to make it special. As for wrapping I just used left over stamped bags from our wedding with a monogrammed sticker.

20131223-054245.jpg
All in all, a fun, quick, and inexpensive gift idea for the neighbors, co-workers and even that friend with the crazy family;-) Merry Christmas everyone.

Finally some Christmas Cheer!

With all these printables you probably thought we’d forgotten Christmas?…Nope! We may be on a tight budget but that doesn’t mean we’re Scrooges. Luckily decorating a house doesn’t have to break the bank. Most of our decorations were hand me downs from family and gifts from friends, which makes them all the more special. Although we still haven’t upgraded our “dorm room” sized tree, but the hubby ensures me it’s his favorite spot in the house to enjoy a Christmas cocktail. (He loves his vintage, “Mad men” chair) Here are a few pictures that will hopefully brighten your morning all via the iPhone. We’ll be back next week with last minute Christmas gift ideas. Happy holidays!

20131215-102815.jpg

20131215-102833.jpg

20131215-102849.jpg

20131215-102909.jpg

20131215-102940.jpg

20131215-102952.jpg

20131215-103501.jpg

Our Busy People Series…The Busy Investor…And where are the dogs?

We are busy, busy people…We work very long hours and are dedicated to our careers. We run a blog, starting a part-time business, renovating an old home, and are parents to two high maintenance pooches. (Who are probably more toddler-like than the average toddler). Which is why I am constantly trying to find new ways to be better organized, efficient, and manage my time wisely. Hence the Busy People Series was born!

We kicked it off with the Busy Budgeter, and now we’re on to the Busy Investor.

Free Investment Printables Cover

Ugh! Investments! Yuck! Retirement! Those are words dreaded by many. Including my husband. His eyes will glaze over with boredom, and even try to sidle his way out of the room. While I’m definitely the number crunching, science, and business nerd in the relationship. I love it! In fact I’ve been part of a women’s investment group/book club for the last three years. (SHOUT OUT TO THE FAB LADIES OF LEAP!)

What I’ve learned from the group is that investments and retirement planning can be intimidating for many women. (Some of us came to the group knowing absolutely nothing about finance.) Yet you don’t have to be a day trader, financial whiz or number crunching nerd to be successful in investing. Which is why we wanted to share our system that is both time saving, organized, and easy to follow. All you need is a little time set aside every month or every 3 months to sit down and review your accounts. Here we go…

First free printable is easy…A cute cover…Unlike the last Busy Budgeter printables, these are meant to fit in a standard 3 ring binder. (Because who wants to trek around ALL their important retirement and investment info?)

Free Investment Printables Cover  Free_investment_printable_cover

Second are the money goals…Creating a short-term, mid-term, and long-term plan for your money is crucial to making your money work for you. We need money goals to help stay the course for where we want to be financially in the next 1, 5 or 20+ years. For example maybe a money goal for you is to buy a house in the next five years and you need to save for a down payment. Write it down in the time period that suites your finances best. Also have fun and go wild with your goals! You might end up hitting one or all if you stay the course. Even the free spirited, creative dreamers love this part!

Free Investment Printables Money GoalsFree_investment_printable_money_goals

Third are your asset and liabilities trackers…Use the printables to keep a running tally of what you have and what you owe. If you are using the Busy Budgeter trackers then you may already have this information readily available. Yay for saving time!

Free Investment Printables Asset TrackerFree Investment Printables Liabilities Tracker

Free_investment_printable_assets                     Free_investment_printable_liabilities

The monthly graphs allow you to track your progress on each. (Write your totals from the trackers on the vertical line for each corresponding month) Also don’t forget to write down notes of encouragement as you go.

Free Investment Printables Asset GraphFree Investment Printables Liabilities Graph

Free_investment_printable_assets_graph Free_investment_printable_liabilities_graph

Your goal is to see your Assets graph go up, and your Liabilities graph go down. I’ve found the graphs to be incredibly helpful in providing a visual of our progress. If you’re a visual person who hates number crunching these graphs are fabulous for staying motivated.

Now the next is MY favorite part…Its your Investment/Retirement “Buckets”…This is the easiest way to understand the concept of “Asset Allocation”. (And the part where my hubby’s eyes glaze over) In fact not even the financial gurus can fully explain how the concept works…But here is how it works for us. Essentially who wants to place all their nest “eggs” in one basket right? We have found it easier to think of our investment accounts as different baskets, or rather “Buckets”. For example we have a “bucket”/account that is conservative, one for aggressive growth, one for short term savings, one for balance, etc. (Here’s a visual example)

Investment Buckets example

You want your investments to “zig when others are zagging” or visa versa. When the market is good our conservative “bucket” will lag, and my balanced or growth “bucket” normally does great. Each bucket either resides in a specific type of account best suited for the tax advantages, borrowing options, liquidity…(Wait I know I lost some of you now)…Instead here is a great resource to learn more about types of accounts, advantages/disadvantages and terms at Investopedia.com (ie. IRA, Roth IRA, 401K, 403Bs, online brokerage, etc) Also when you access your investment accounts, there is a tab or field called the “year to date”, and normally there will be a return % available. You use this number to see how well you did in your investment account (the ROI or return on your investment).

Free Investment Printables Investment BucketsFree_investment_printable_investments

If you want to skip this printable be my guest. Basically this is just great practice for investing and understanding retirement. You don’t need to focus on the day to day gains or losses, but rather calculating, and being knowledgeable is half the battle. The Labor Department surveyed that only 42% of Americans have actually tried to calculate how much they will need for retirement. While USAToday stated 74% of the baby boomers are falling short, which doesn’t bode well for us youngsters. At least staying organized, tracking and creating money goals will start us on the right foot.

Lastly is the Statements and Correspondence cover…A great place to separate and store your account statements and letters from your investments. Basically the binder is designed to be your one-stop, central place for all things investing.

Free Investment Printables Statements and Correspondence CoverFree_investment_printable_statements

Have we lost you? Hopefully not. Instead we hope this post will help you as an early kick off to your New Years resolutions and a good tool for organizing that file cabinet. We promise in the coming Sundays we’ll be back to dogs, home and holiday cheer. Till then, Happy Sunday everyone!

Black Friday Buzz Kill… (and Free Budget Printables)

After talking to several friends and family, it seems we’re not the only ones feeling a bit of pain in the pocketbook. Holiday season 2013, is going to be a bit lean for us and others. Which is why I thought it would be the perfect time to be the “Debbie Downer” of the Black Friday buzz. Why? Because of our recent vacation views like these… (Which really keep us centered and remind us of the importance of celebrating the holidays with family and friends, is more important than the stuff.) free budget printables 008 free budget printables 007

Also having our second water heater blow up, and new car brakes will keep a person very budget conscious. Budgets are something I love! Friends sometimes tease us about our OCD tendencies and the mysterious “budget” we refer to. Yet  budgets work, and we thought it might be useful to others out there experiencing a lean Holiday season. Also a great way to kick off our Busy People series, starting with the Busy Budgeter…So here it is…

free mini budget printables asset and liabilities tracker

Free_printables_mini_monthly_budget_sheets_assets_liabilities_tracker

(I’ve taken our spreadsheets and turned them into a handy mini budget binder!) Aren’t you just as excited as we are?!jump for joy

Not to be left out, we included the Assets and Liabilities tracker (Forgive the financial lingo) as the second page to the monthly budget printable. Also here is the newest edition…A spending journal (I started paying for the personal and grocery expenses with cash and an envelope system) and we needed a place to track all the details. Luckily Sarah at the Accidental Okie has a lovely budget system (seriously she makes budgeting so stylish), and we need to give her full credit for the inspiration of my mini spending journal. free mini spending journal tracker

free mini spending tracker and journal sheets

Basically all the sheets are sized to fit a 1 inch 5×8 binder. I use the Avery pocket binder with the built in folder/pocket to store my cash envelope system, receipts and pens.

free budget printables 002free budget printables 004free budget printables 028

Also the 5×8 size allows me to easily store the binder away in the purse so I can always budget on the go.

free budget printables 030

Each sheet is separated by a divider: Monthly Budget, Assets Sheet, Liabilities Sheet, and Spending Journal. Just fold and cut the sheets in half for each one, and three hole punch for the binder.

free budget printables 009

free budget printables 017free budget printables 020free budget printables 019free budget printables 024

I even found some plastic protectors for my coupons and mini binder paper for brainstorming weekly meal plans and grocery lists. (I’m not nearly as organized with my meal planning yet because of a new diet)

free budget printables 026free budget printables 011

We hope you find our system useful and that I didn’t completely kill your Black Friday Buzz. However as sneak peek for next Sunday’s post we have a couple follow up posts for our Busy People Series…Have a safe, fun and budget friendly Thanksgiving from us and the pups!

Defrosting the Ferns…Easy way to Protect your Plants during Winter

Yay! Fall (and in some places Winter) is upon us! Only problem is if you have tropical plants (zone 9-9b+) you know its also time to protect them. We’ve used the special frost fabric, and even old bed sheets in the past, but here is our newest and cheapest technique for protecting plants from winter’s chill. This inexpensive trick was suggested by the garden experts at Green Acres here in Sacramento after we almost fell over looking at pop up “frost tents” ($17 a piece!). All you will need is some burlap (a roll is about $10-$12 at Home Depot), long bamboo stakes ($0.89-$1.50) and lots of dried leaves (we have plenty of those this time of year). As for tools you’ll need only scissors and a hand staple gun. protecting plants from frost 010protecting plants from frost 011

First sink your bamboo stakes, either 3 or 4, to a pot/plant depending how large your plants are.

protecting plants from frost 006

Next wrap your plant with the burlap and attach it to the bamboo stakes using the staple gun or even stapling it to the adjacent fence if necessary.

protecting plants from frost 009

protecting plants from frost 004

Finally add your leaves, and be sure to cover the root ball or base of your plant, as the experts say, its actually not the outer leaves, branches, etc you’re trying to protect but rather the root system. If you don’t have leaves, they suggested purchasing cedar mulch.

protecting plants from frost 005

Now if you have a real hard frost, use any excess burlap to cover the tops of the plants at night, and just remove the covers during the day so they can still get some winter sun, rain and/or if the day warms up. They also suggested to give the plants a good watering during the warmest part of the day at least twice a week during dry, cold stretches. (Making sure the water is penetrating the root system.) This may not be the prettiest idea, but it should protect our tropical plants.  We’ll free the “girls” in the spring and see if this technique actually worked!

protecting plants from frost 013

Keep Calm and Clean On…(Lessons learned from a flooded basement)…And Free Printable!

All was quiet on the blog-front last week…(Sorry guys!)…And thank you for the reader emails and messages of concern. #Thanksformissingus! (That was sort of cool!) Anyway we had a couple good excuses for no Sunday morning blog post. The first and biggest was our water heater met an untimely death, and flooded our basement. We lost several boxes of photos, books, craft supplies, wine, electronics and a desktop computer. We also had a massive amount of cleaning, and lost hours of our lives dealing with the home warranty company plumbers. Yet in the end we have a new water heater and some new knowledge about home insurance policies.

Home Inventory Checklist printable  Home Inventory Checklist printable

Create a Home Inventory Checklist

In the midst of damage control you may have forgotten what was in those boxes or rubbermaid containers. Whether it was a storage closet, a basement, or even in a room we often don’t remember what we were storing away or had in the first place. Essentially print one checklist for each room and itemize all valuables, furniture, etc, in it. Don’t forget to list whats in the closets, basements, garages, guest houses, and attics.

Make a Home Movie

Walk around your house with the video camera. We often narrate and describe the items we are recording. Luckily we do this every year usually around New Years and/or tax time. There is a reason for the timing, 1) we normally have some new things after Christmas, and/or 2) taxes always brings out the organizer in us and when we finally pull out that ol’ receipt file.

Don’t Leave them at the Home

Store your video and home Inventory checklist off-site from your actual home. This can be with a trustworthy family member, or in a safe security box at your local bank. We chose the later, because our bank offered a safe security box for free to us anyway, and what should happen if that family member has their own fire or flood?

Hopefully you will not need to use your Home Inventory, but as we all know…Life happens.

Fall Trees and Fab Freebies! $20 Challenge

free trees 012

Its fall and in Sacramento this is the perfect time to plant trees and shrubs. Also a great time to start our $20 Challenge. We’re going to see how many house updates and projects we can come up with under $20. With the holidays approaching, new roof installed and financial goals in 2014 its probably a good idea. Luckily the SMUD (Sacramento Municipal Utilities District) Free Tree program and our friend Erik at Healthy Turf Lawn Aeration made our first $20 Challenge possible. Our back fence line was incredibly bare with only ugly telephone poles, until we added our privacy screens this last spring. Here is the latest pic of our trumpet vine filling in the screen nicely.  (Unfortunately the honey suckle next to it needs some more time)

free trees 011


First as part of the challenge we decided to install a submerged drip system by changing an old sprinkler pipe into a spigot. This required $4 worth of PVC connectors and a spigot, along with some leftover soaker hose.

free trees 003free trees 004free trees 005free trees 006

The last part was easy, we planted about 12 different shrubs and trees, including flax, nadina, and golden boxwood, thanks to a Home Depot $10 special and our friends at HTLA maintenance and landscaping . Oftentimes their clients want them to tear out perfectly good plants and trees. These guys don’t want to see good plants go to waste so we were able to snag a few free ones for our project.  Also with SMUD’s free tree program, and a little palm from the side yard,  we hope this will jump start our tropical dream backyard. The backyard still has a long way to go but hopefully with budget friendly ideas and a bit creativity, our bare and ugly backyard will have some worthy “after” shots someday. Grow little plants grow!free trees 012